Backstage - Splunk On-Call Plugin
This contribution is a new feature.
Introduction
Backstage + Splunk On-Call Plugin
Project
You can find the Backstage project presentation here.
Context
In order to understand the initial issue you need to have a basic understanding of what a plugin is.
What is a Backstage plugin ?
Backstage is an application build on top of a set of plugins.
A plugin lets you expose any kind of infrastructure or software development tool in Backstage.
This means you can write your own plugins to add new functionalities to Backstage.
In this case we will implement a plugin to integrate Splunk On-Call (previously VictorOps) functionalities.
What is Splunk On-Call ?
Do you know what happen when your service break down ? Does someone get notified ? Can that person fix the problem ?
These questions can occur anytime a service encounters a problem.
Splunk On-Call helps you answer these questions by automating incident management.
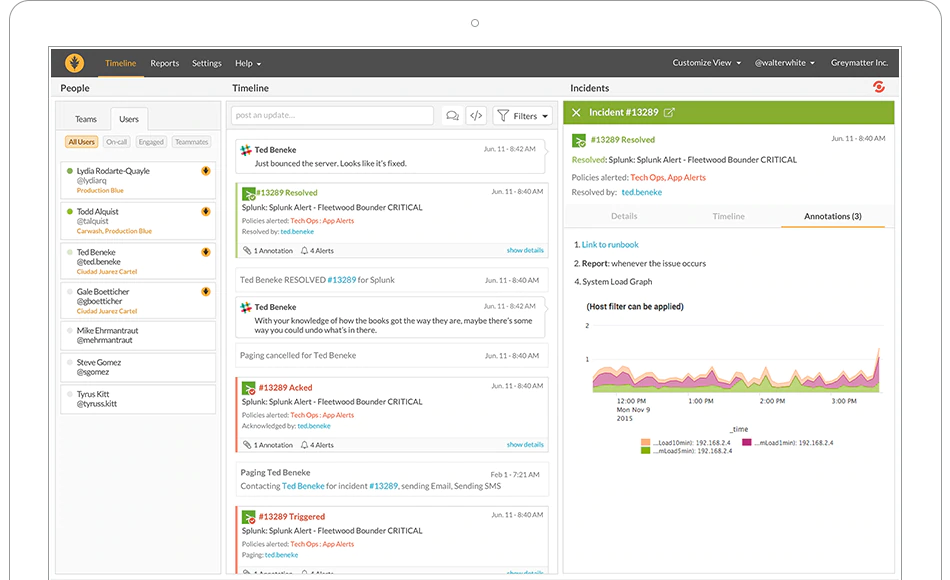
Splunk On-Call dashboard
Before continuing, you need to have a basic familiarity with incident management concepts.
Incident management
An incident management system apply a logical operation to an Incident.It can determines:
- Who should be alerted to this particular incident
- What method of notification is used (SMS, email, etc)
- The state of the incident and execution of secondary workflows
Here are the “Five Phases” of the Incident Management framework:
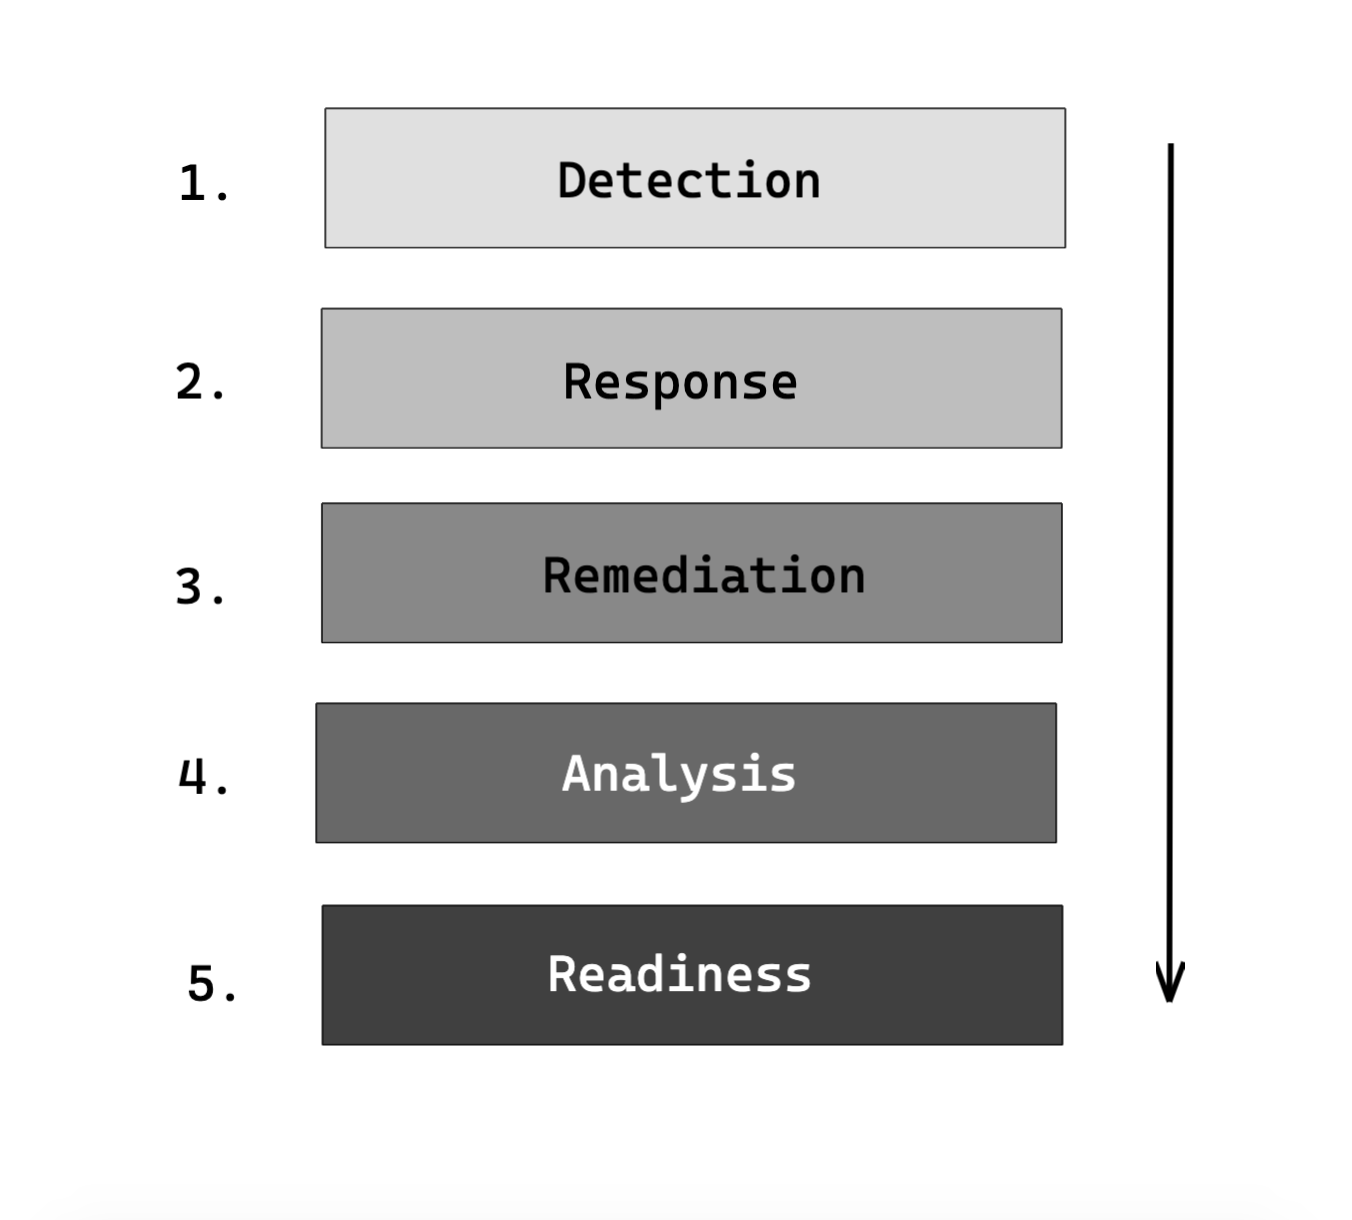
Incident management framework
You can learn more about Effective DevOps Incident Management Teams here.
1. The initial step of the incident lifecycle is knowing about the problem.
2. The second step helps you establish the severity and priority of the problem.
We can split it into three points:
- Triage (What's going on?)
- Investigation (How bad is it?)
- Identification (How long has it been occuring?)
3. The third step helps you to understand more regarding leading factors of incidents during remediation. For example, a small "fix" can have implications elsewhere in your system and you must be aware of this.
4. The fourth step will allow you to make a complete analysis about the incident:
- How do we know about the problem faster?
- How do we recover from the problem faster?
5. The fifth step will provides great metrics to review for further improvements.
It will allow your team to improve the way they respond to incidents.
- What you can learn from those mistakes?
Here is the list of some terms with their definition that you can find in this article:
Rotation: A rotation is a recurring schedule, consisting of one or multiple work shifts, with team members alternating through a work shift.
Incident escalation: this is what happens when a person can't resolve an incident themselves and needs to report the incident to someone else (team, person, etc)
Escalation policy: this answers the question of how your organization handles these incidents.
It defines who should be notified when an incident is triggered, and who the incident should escalate to if the first responder isn’t available.
Once one person has responded, the escalation policy will stop escalation, and no further notifications will be sent.
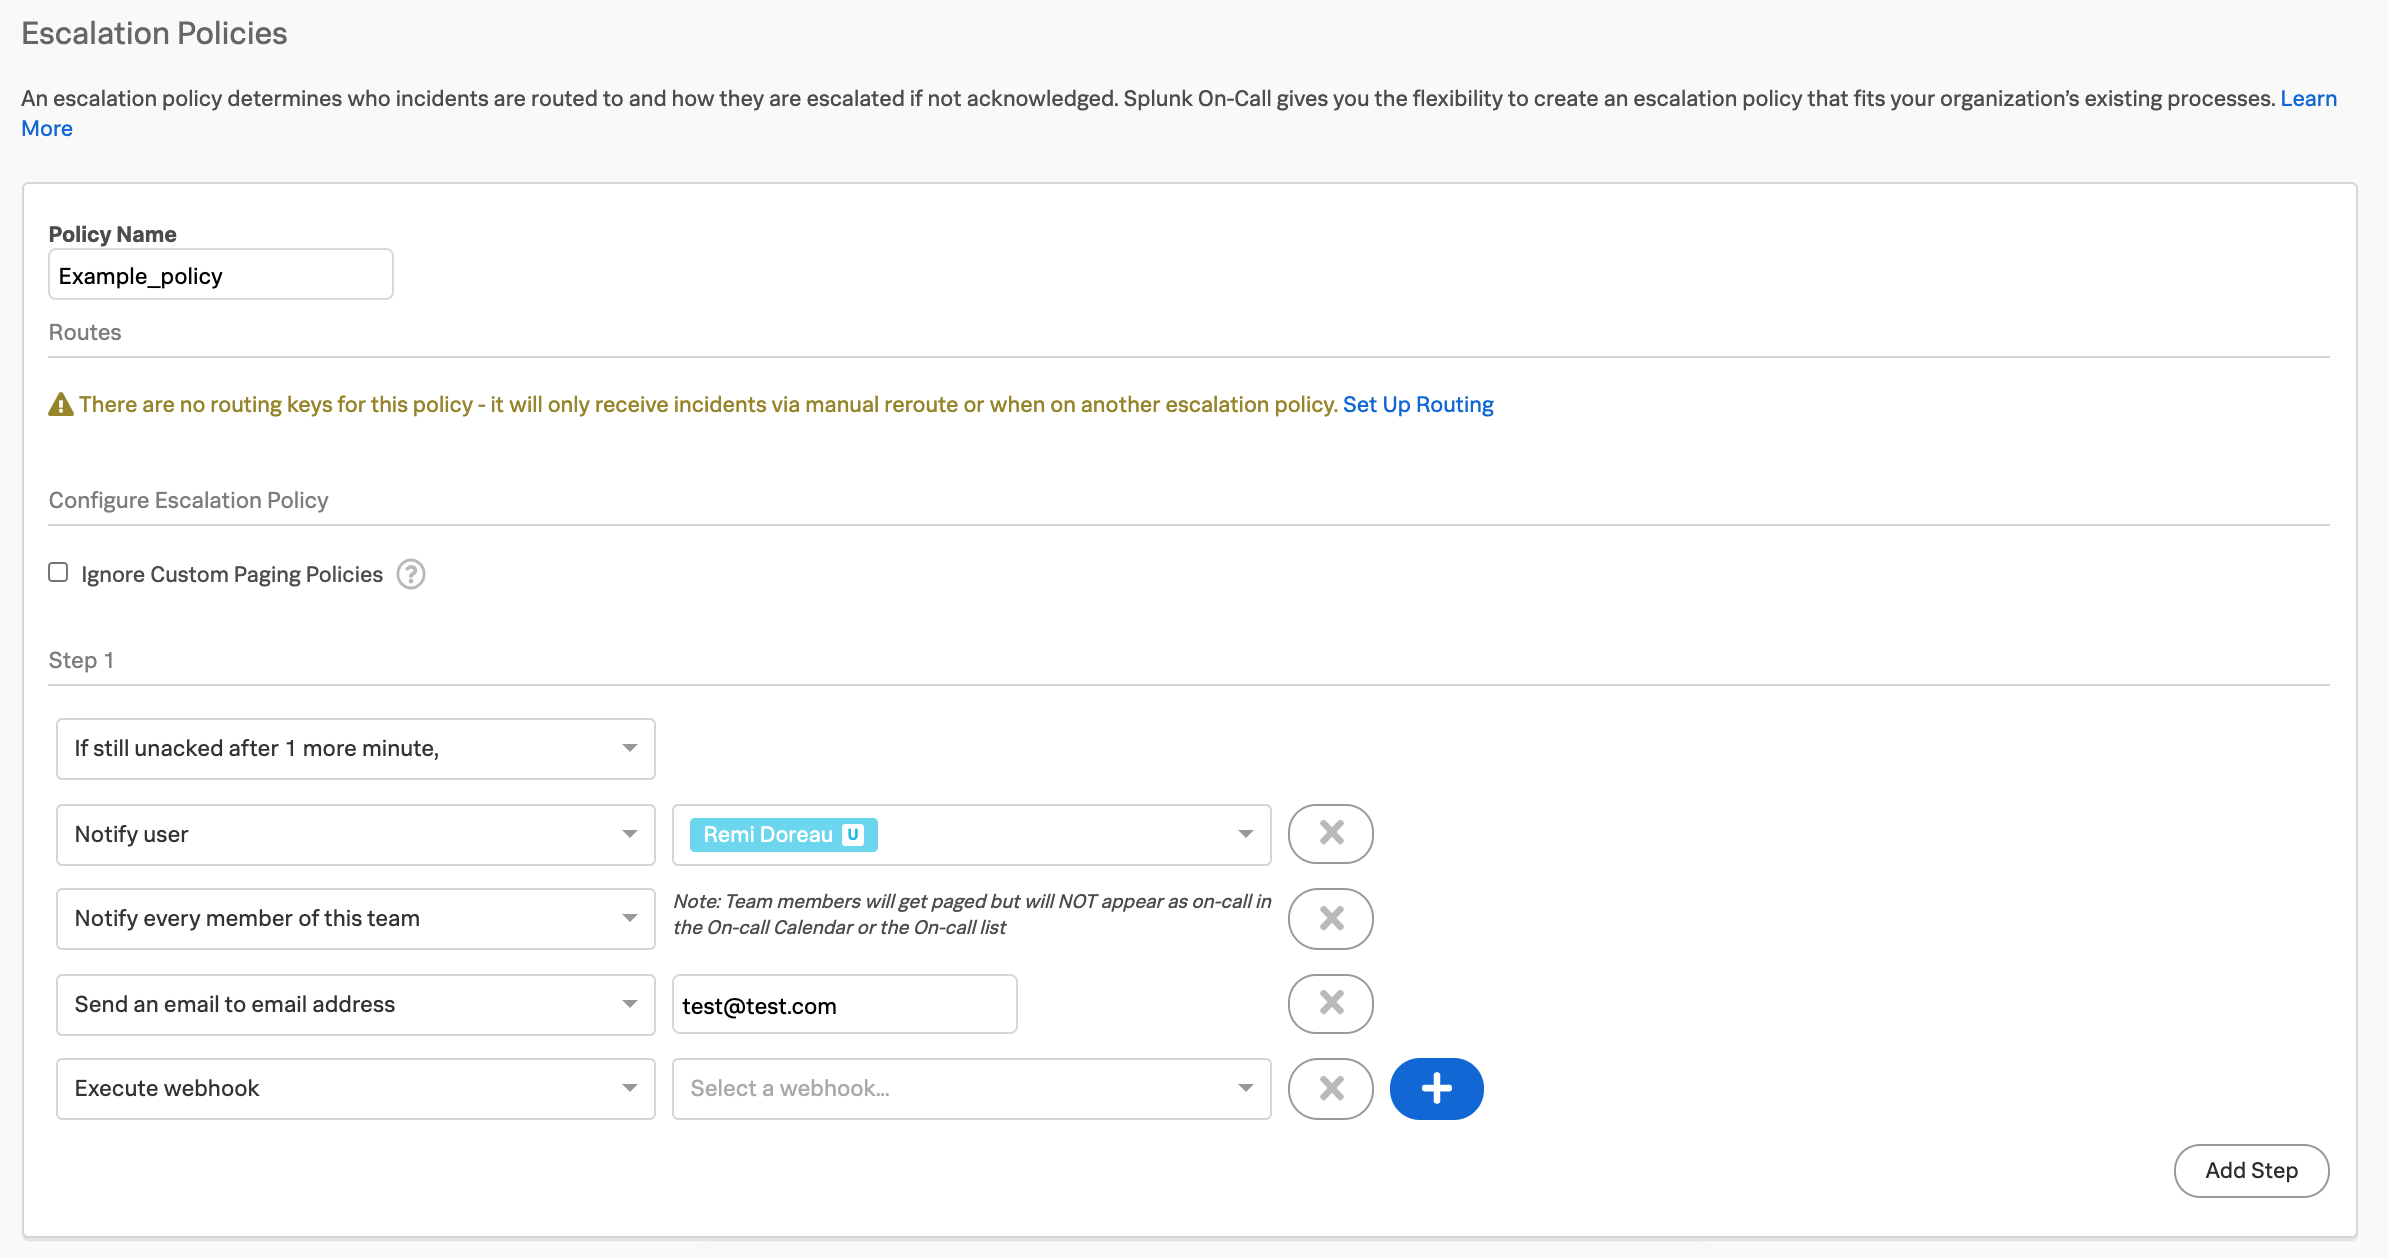
Splunk On-Call Escalation policy creation
Current behavior
For the moment only one incident management plugin exists, PagerDuty.
Some people use Splunk On-Call VictorOps as their on-duty rotation manager and would like it to be integrated into backstage.
The goal of the issue is to implement a new plugin for Splunk On-Call.
This plugin should provides:
- A list of incidents
- A way to trigger a new incident to specific users and/or teams
- A way to acknowledge/resolve an incident
- Information details about the persons on-call
Implement the solution
The code blocks are intentionally incomplete for the sake of readability.
If you want to read the full code you'll find it in the PR link at the top.
This PR being still Open, some parts are likely to change.
I will keep the article updated if any changes are made.
Create the plugin
To create a new plugin, the Backstage CLI already has a command that we can use:
yarn create-plugin splunk-on-call
This will setup a new Backstage plugin with the ID we provided.
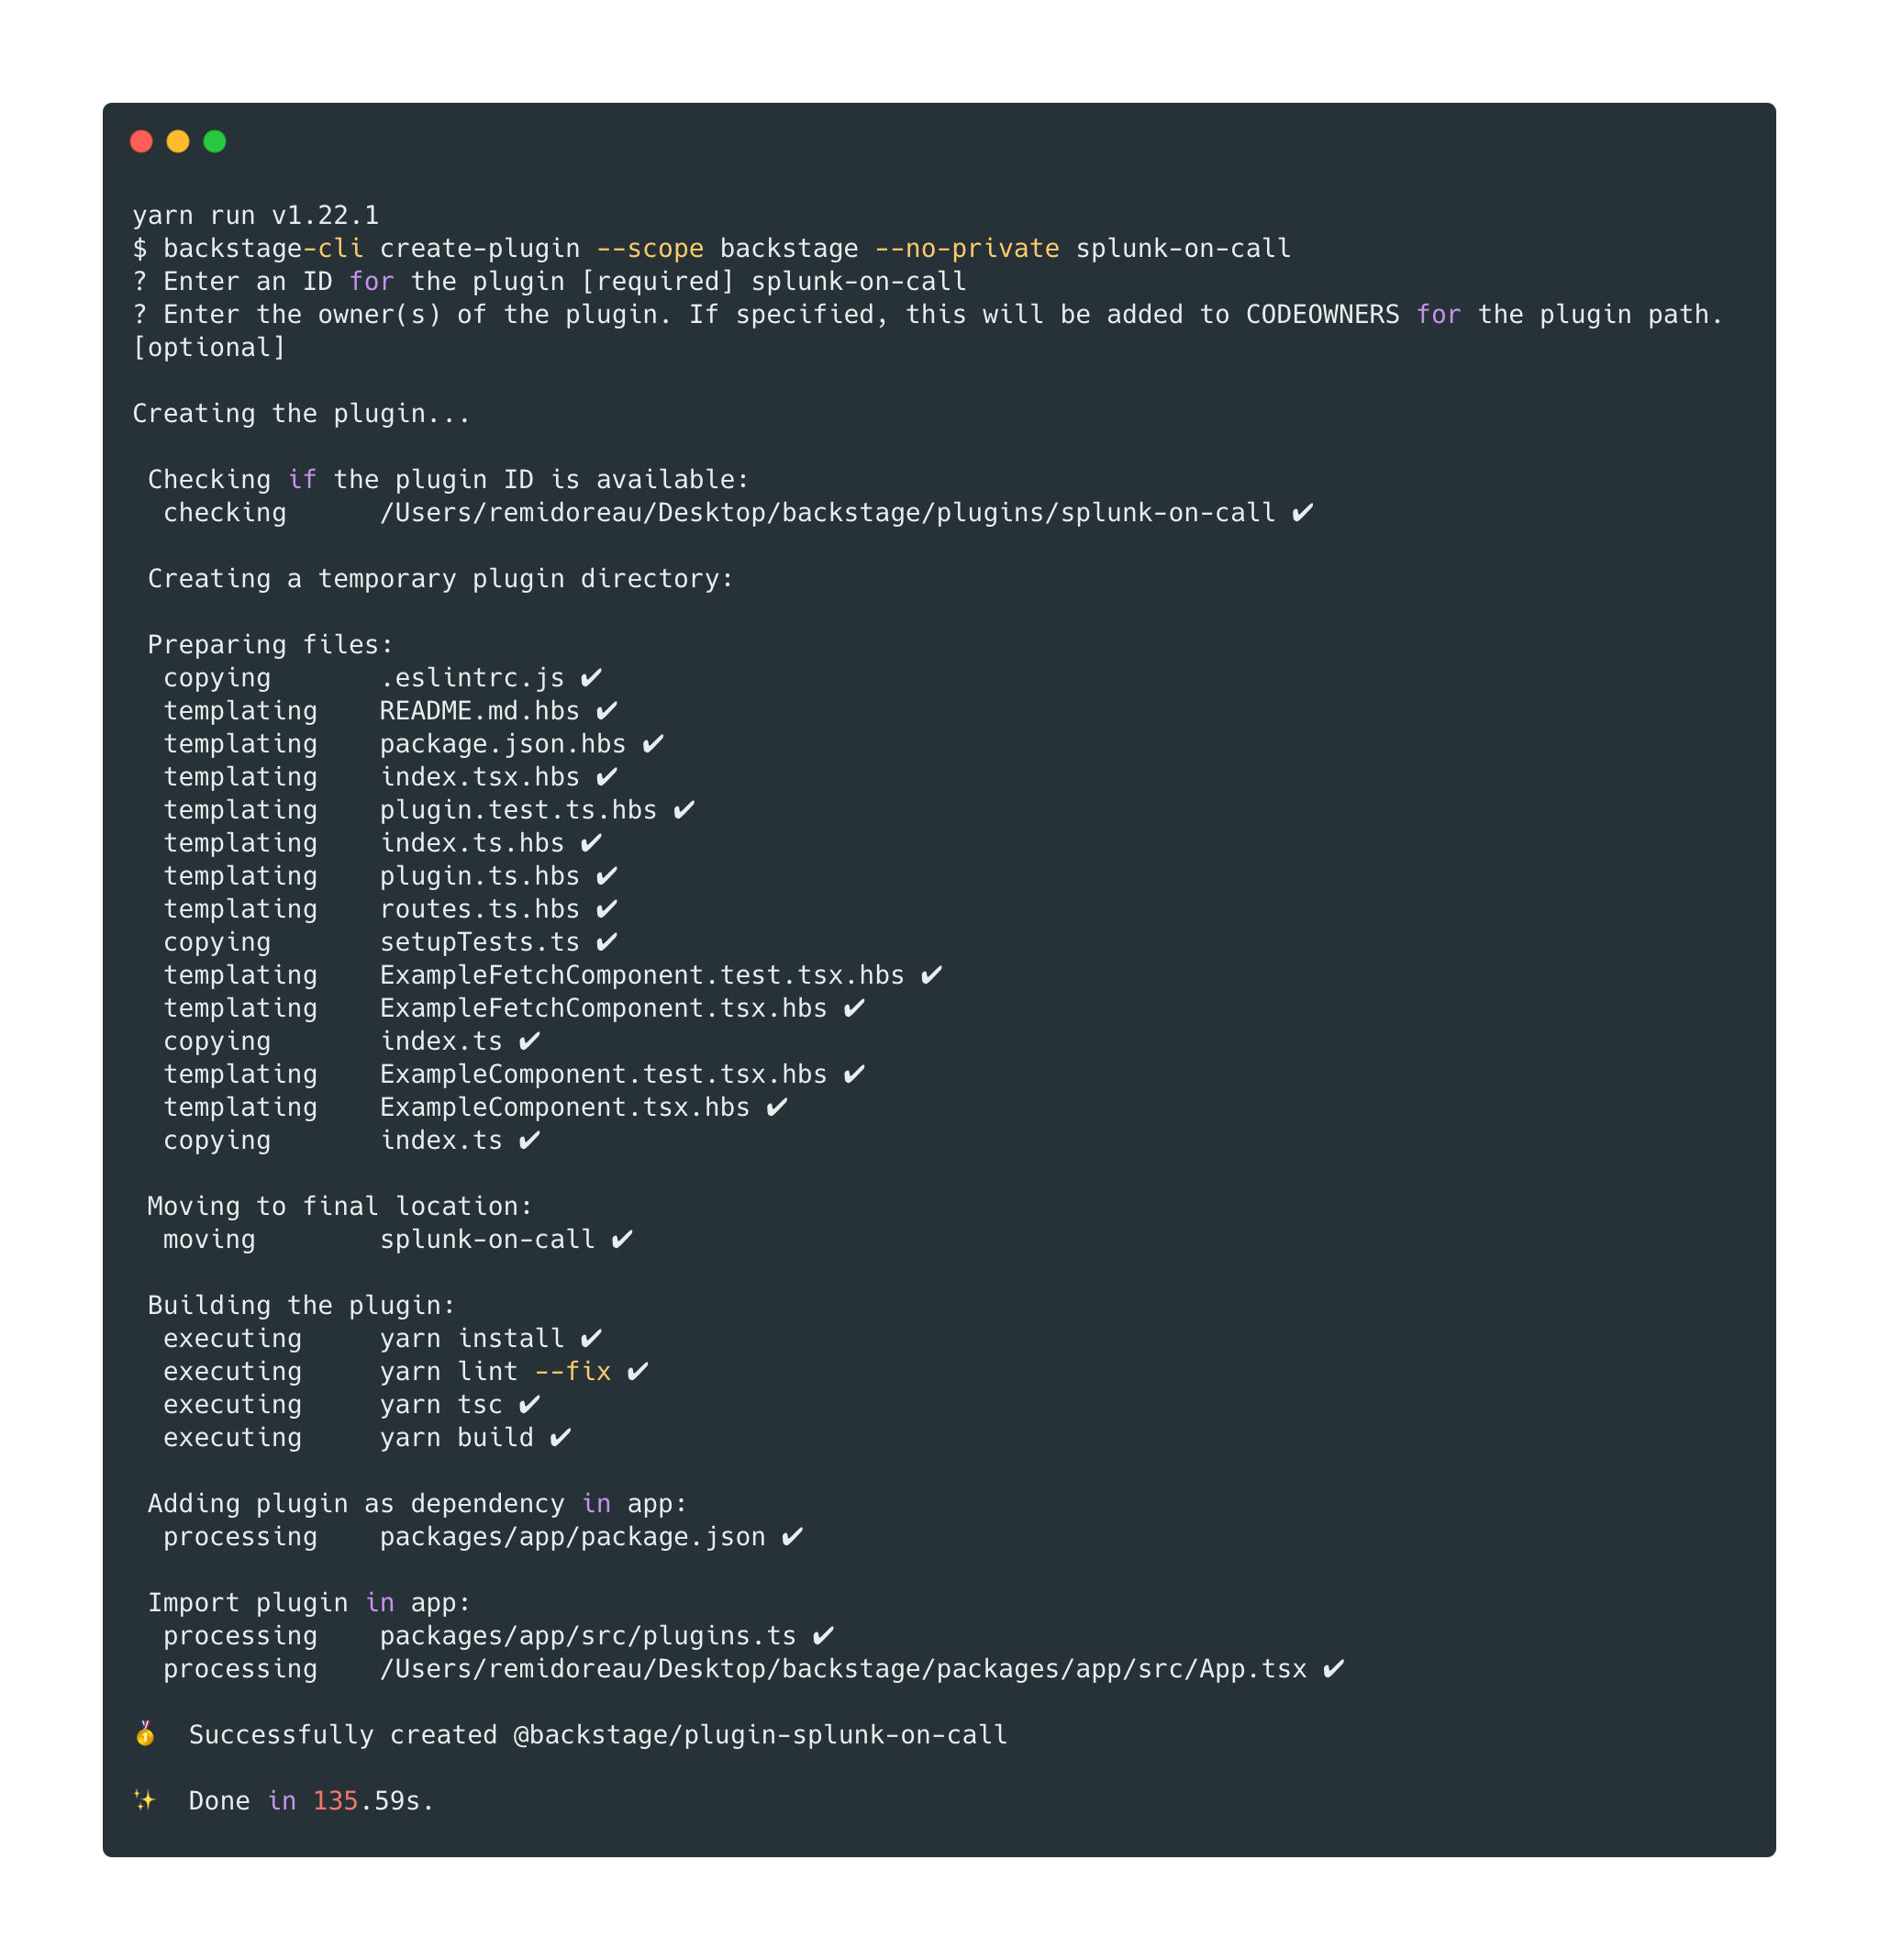
We have now a working example plugin on which we will base to add our different functionalities.
Our plugin will be created with the createPlugin method which will create a new plugin instance:
export const plugin = createPlugin({
  id: "splunk-on-call",
  apis: [
    createApiFactory({
      api: splunkOnCallApiRef,
      deps: { discoveryApi: discoveryApiRef, configApi: configApiRef },
      factory: ({ configApi, discoveryApi }) =>
        SplunkOnCallClient.fromConfig(configApi, discoveryApi),
    }),
  ],
});
Folder structure
The plugin looks like a separate package, it has a package.json and a src folder.
It allows us to have a better independence of the different plugins, to deploy them separately and to work on them in isolation from the rest of the application.
Note that the index.ts files are there to let us import from the folder path and not specific files.
.
├── README.md # Display information about the plugin
├── dev
│   └── index.tsx
├── package.json
└── src
    ├── api # Plugin API
    │   ├── client.ts
    │   ├── index.ts
    │   ├── mocks.ts
    │   └── types.ts
    ├── assets
    │   └── emptystate.svg
    ├── components # Plugin components
    │   ├── Errors
    │   │   ├── MissingApiKeyOrApiIdError.tsx
    │   │   └── index.ts
    │   ├── Escalation
    │   │   ├── Escalation.test.tsx
    │   │   ├── EscalationPolicy.tsx
    │   │   ├── EscalationUser.tsx
    │   │   ├── EscalationUsersEmptyState.tsx
    │   │   └── index.ts
    │   ├── Incident
    │   │   ├── IncidentEmptyState.tsx
    │   │   ├── IncidentListItem.tsx
    │   │   ├── Incidents.test.tsx
    │   │   ├── Incidents.tsx
    │   │   └── index.ts
    │   ├── SplunkOnCallCard.test.tsx
    │   ├── SplunkOnCallCard.tsx
    │   ├── TriggerDialog
    │   │   ├── TriggerDialog.test.tsx
    │   │   ├── TriggerDialog.tsx
    │   │   └── index.ts
    │   └── types.ts
    ├── index.ts # Plugin entry point
    ├── plugin.test.ts
    ├── plugin.ts # Plugin creation
    └── setupTests.ts
Create the plugin Marketplace entry
In order to allow people to use our plugin, we need to add it to the Backstage plugin marketplace.
The marketplace is used to:
- List the available plugins with information (title, description, tag, etc)
- Show who that contributed it (user-company)
- Link to appropriate documentation
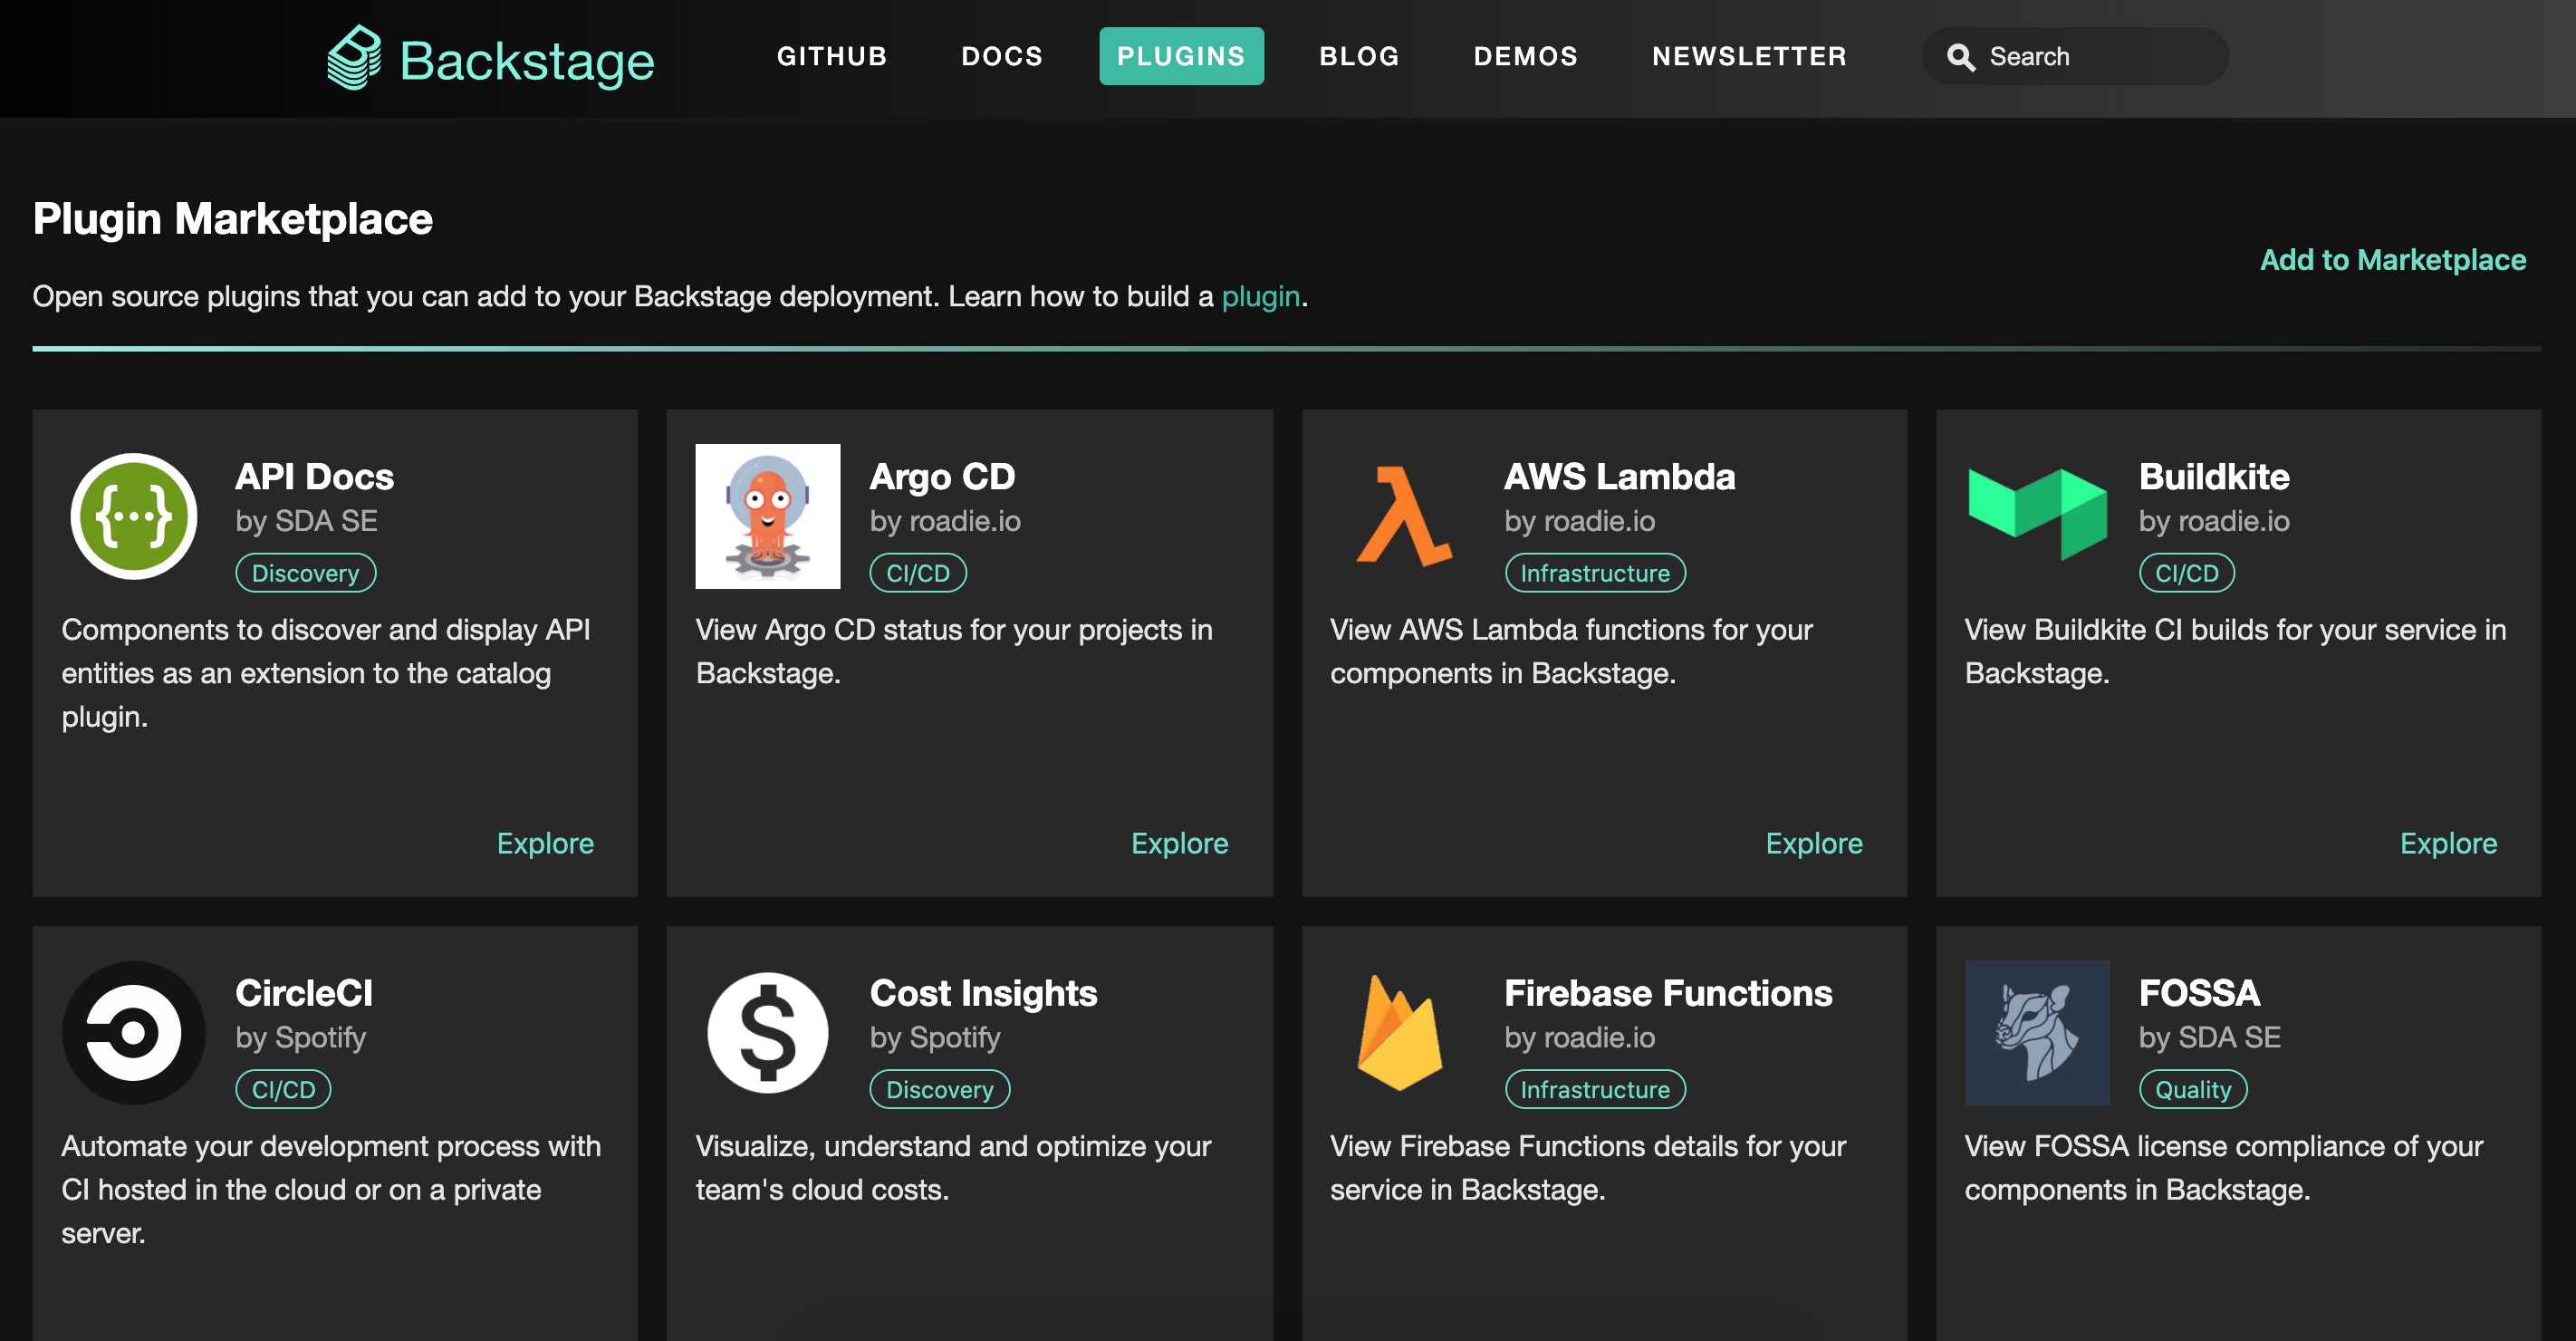
Backstage Marketplace
To add the plugin to the marketplace, we need to create a file in microsite/data/plugins with our plugin's information.
---
title: Splunk On-Call
author: Spotify
authorUrl: https://github.com/spotify
category: Monitoring
description: Splunk On-Call offers a simple way to identify incidents and escalation policies.
documentation: https://github.com/backstage/backstage/tree/master/plugins/splunk-on-call
iconUrl: data:image/svg+xml;base64, # ...
npmPackageName: "@backstage/plugin-splunk-on-call"
tags:
  - monitoring
  - errors
  - alerting
  - splunk
Create the plugin API
In order to connect our plugin to the Splun On-Call API, we will make our calls separately from the UI part.
Here is the list of all the routes we are going to implement.
| Method name | Description |
|---|---|
getIncidents | Fetches a list of incidents. |
getOnCallUsers | Fetches the list of users in an escalation policy. |
triggerAlarm | Triggers an incident to specific users and/or specific teams. |
resolveIncident | Resolves an incident. |
acknowledgeIncident | Acknowledge an incident. |
getUsers | Get a list of users for the user organization. |
getTeams | Get a list of teams for the user organization. |
getEscalationPolicies | Get a list of escalation policies for the user organization. |
Proxying
The proxy will allow us to redirect calls from /splunk-on-call to the Splunk On-Call API https://api.victorops.com/api-public and add authentication information in the headers.
By default, the proxy is already added to the default Backstage project:
const proxyEnv = useHotMemoize(module, () => createEnv("proxy"));

const service = createServiceBuilder(module)
  .loadConfig(configReader)
  // ... other routers
  .addRouter("/proxy", await proxy(proxyEnv));
To add our proxy config, we will put our configuration under the proxy key of the app.config.yaml file.
proxy:
  "/splunk-on-call": # The route context: determine which requests should be proxied to the target host
    target: https://api.victorops.com/api-public # target host to proxy to
    headers: # The different headers value to authenticate the requests
      X-VO-Api-Id:
        $env: SPLUNK_ON_CALL_API_ID
      X-VO-Api-Key:
        $env: SPLUNK_ON_CALL_API_KEY
The getIncidents example
In order to understand how the API works, we will take the getIncidents method example.
Note that the factory method fromConfig takes in parameter configApi and discoveryApi which allows us to retrieve some variables related to the app configuration.
(e.g. the this.config.discoveryApi.getBaseUrl('proxy') refers to the proxy base url)
export class SplunkOnCallClient implements SplunkOnCallApi {
  static fromConfig(configApi: ConfigApi, discoveryApi: DiscoveryApi) {
    const usernameFromConfig: string | null =
      configApi.getOptionalString("splunkoncall.username") || null;
    return new SplunkOnCallClient({
      username: usernameFromConfig,
      discoveryApi,
    });
  }
  constructor(private readonly config: ClientApiConfig) {}

  async getIncidents(): Promise<Incident[]> {
    // We retrieve the base url of the proxy
    // on which we can get /splunk-on-call/<endpoint>
    const url = `${await this.config.discoveryApi.getBaseUrl(
      "proxy"
    )}/splunk-on-call/v1/incidents`;

    const { incidents } = await this.getByUrl<IncidentsResponse>(url);

    return incidents;
  }

  // ... other methods

  private async getByUrl<T>(url: string): Promise<T> {
    const options = {
      method: "GET",
      headers: {
        "Content-Type": "application/json",
      },
    };
    const response = await this.request(url, options);

    return response.json();
  }

  // This method is used to make the API calls
  // It also handle the different response errors
  private async request(
    url: string,
    options: RequestOptions
  ): Promise<Response> {
    const response = await fetch(url, options);
    if (response.status === 403) {
      throw new UnauthorizedError();
    }
    if (!response.ok) {
      const payload = await response.json();
      const errors = payload.errors.map((error: string) => error).join(" ");
      const message = `Request failed with ${response.status}, ${errors}`;
      throw new Error(message);
    }
    return response;
  }
}
Create the components
The components folder contains all of our components.
SplunkOnCallCard
This is the main root component, the one that includes the rest of the child components.
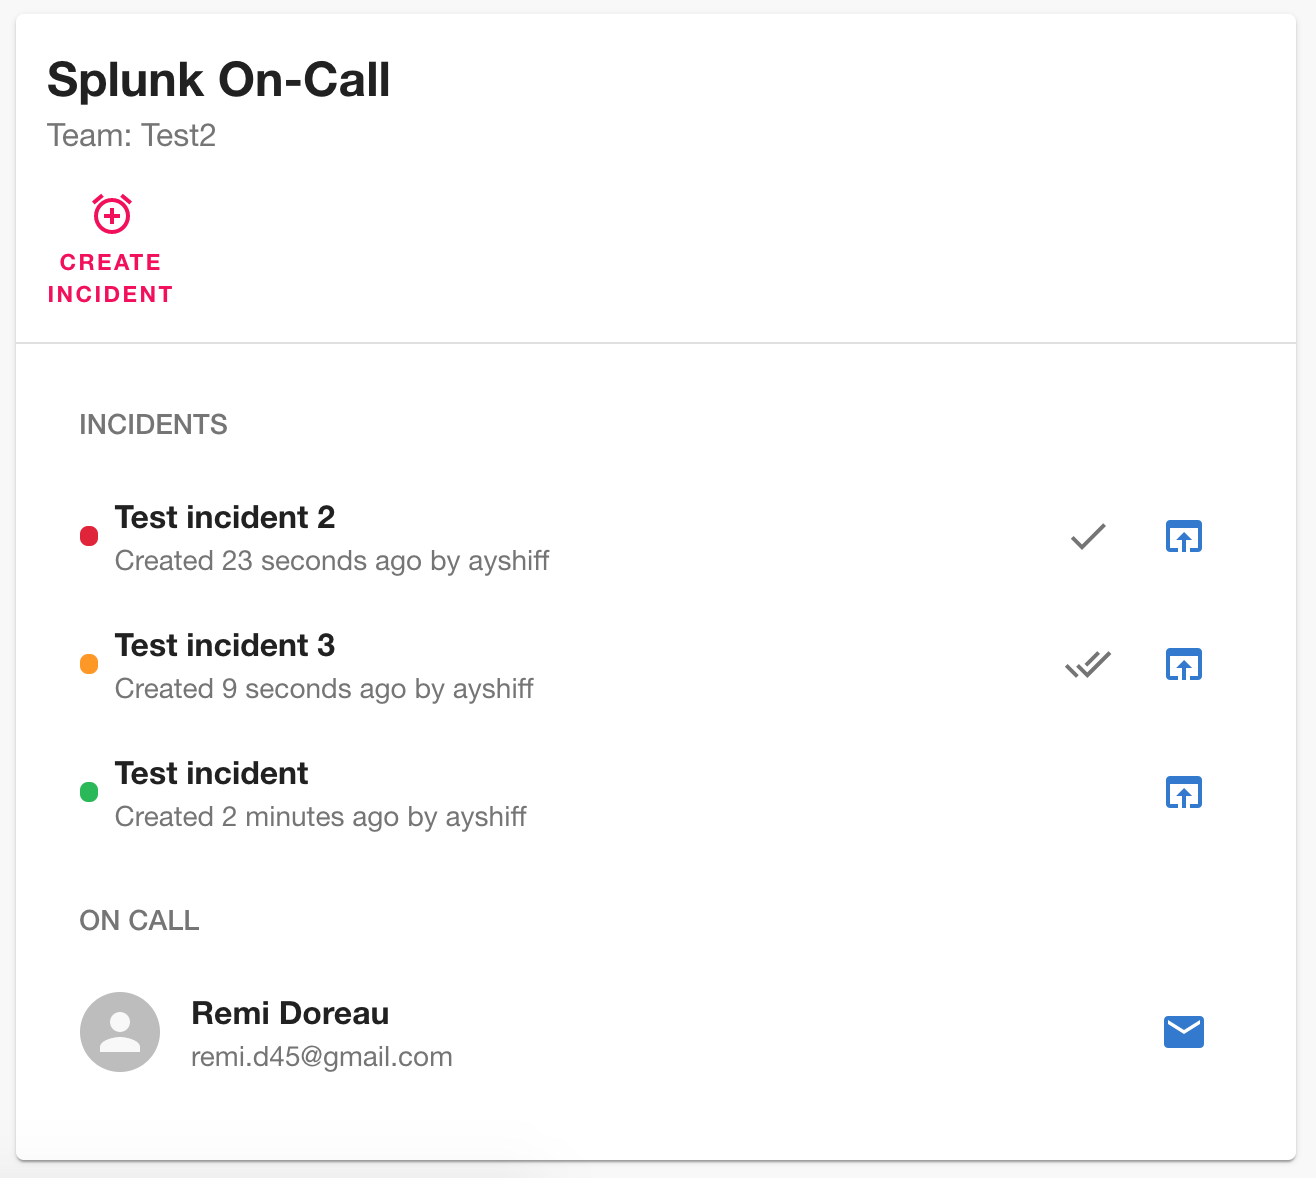
Splunk On-Call Card component
Incident list
This component is used to display the list of the different incidents with their associated information (creator name, creation date, etc).
An incident can have several status: triggered, acknowledge or resolved.
It also have an action section where the user can acknowledge or resolve the incident.
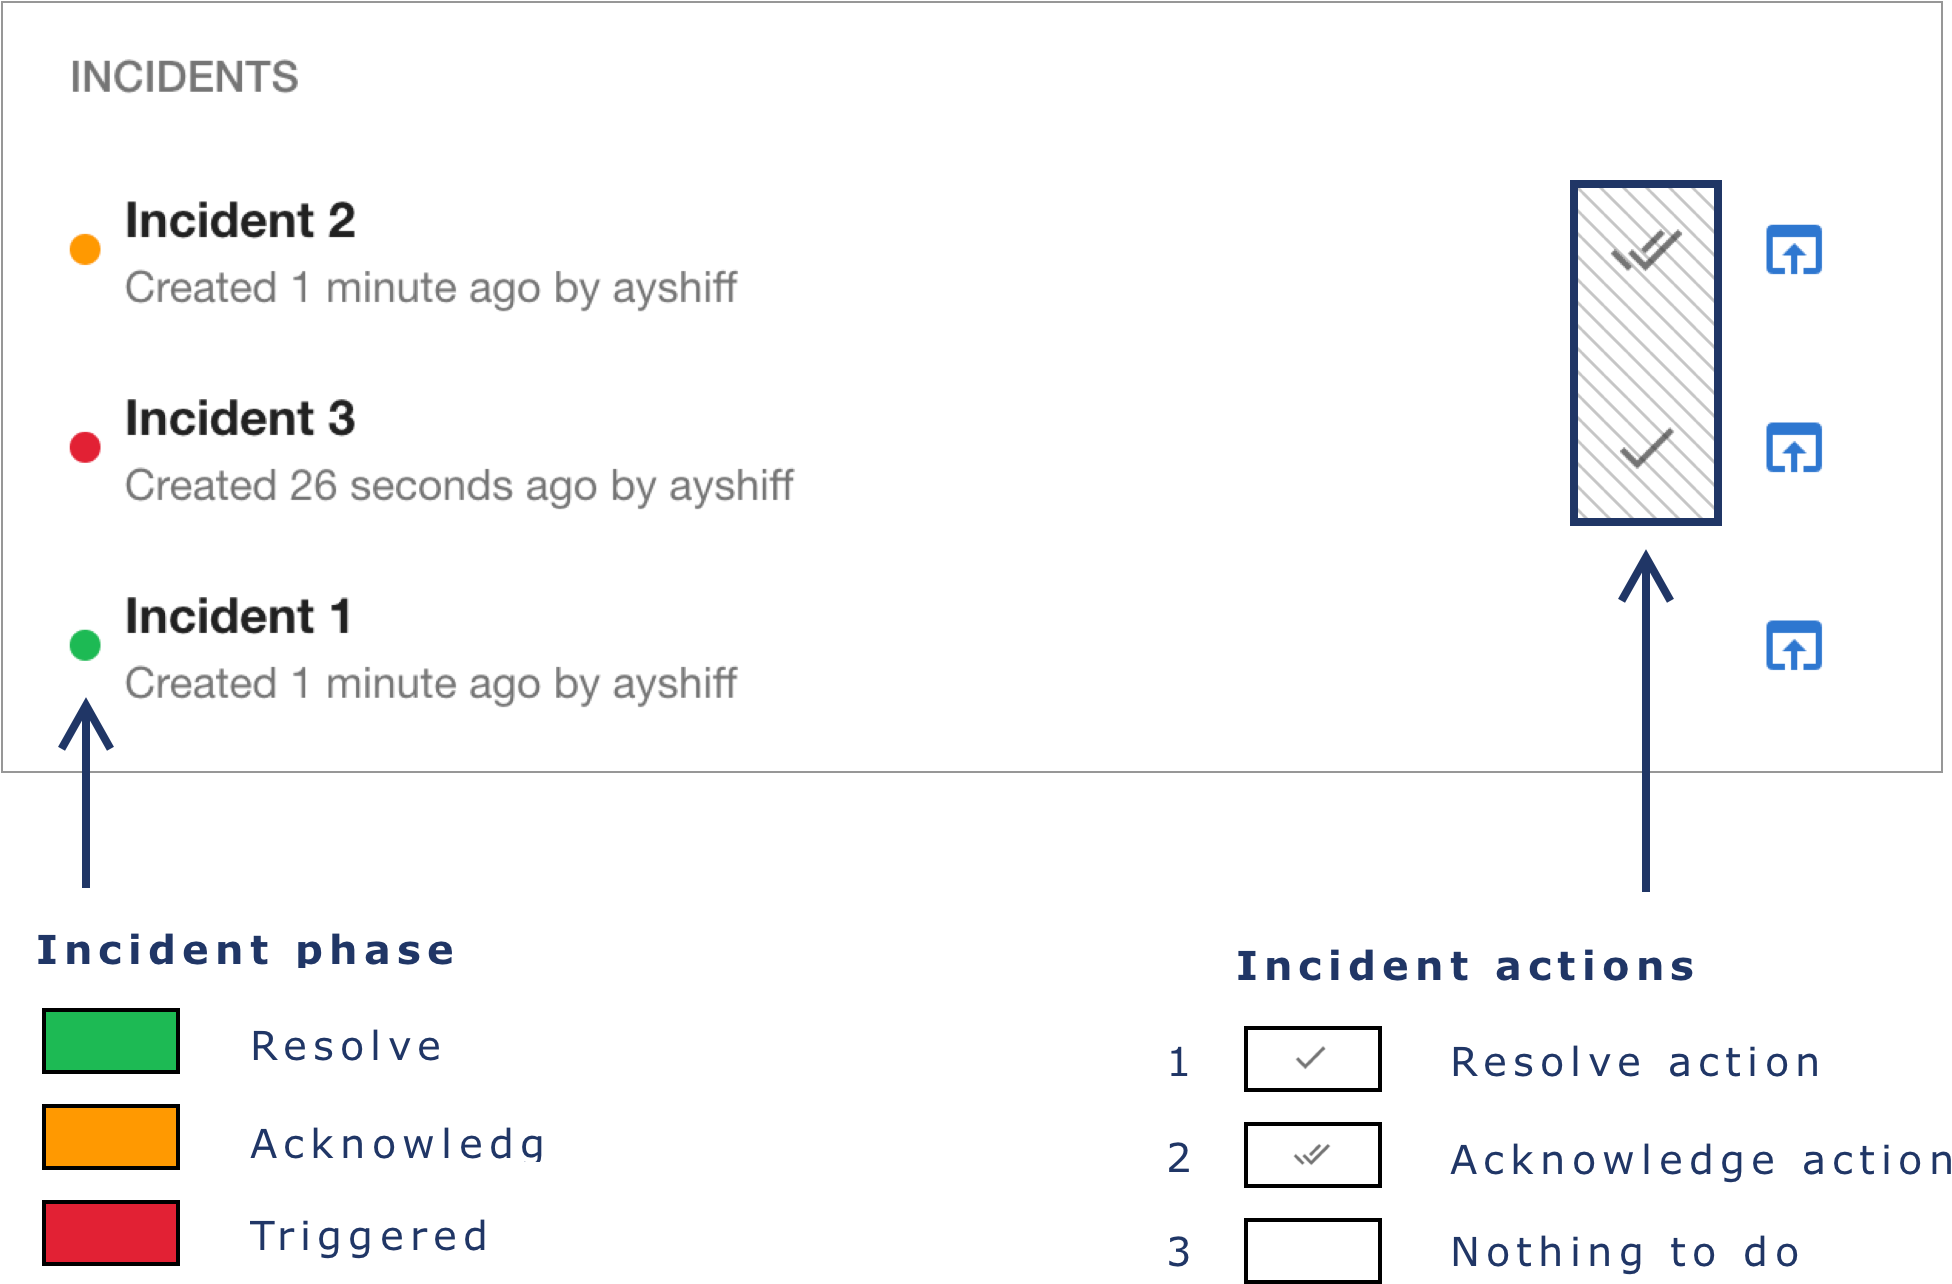
Incident list component
Here is the code of the main Incidents component:
type Props = {
  refreshIncidents: boolean;
};

export const Incidents = ({ refreshIncidents }: Props) => {
  const api = useApi(splunkOnCallApiRef);

  // Fetch the incident list
  const [{ value: incidents, loading, error }, getIncidents] = useAsyncFn(
    async () => {
      const incidents = await api.getIncidents();
      return incidents;
    }
  );

  // Trigger the refresh
  useEffect(() => {
    getIncidents();
  }, [refreshIncidents, getIncidents]);

  // Display the alert if an error occured
  if (error) {
    return (
      <Alert severity="error">
        Error encountered while fetching information. {error.message}
      </Alert>
    );
  }

  // Display the loading component while the request is in progress
  if (loading) {
    return <Progress />;
  }

  // Display the empty state component if we don't have any incident
  if (!incidents?.length) {
    return <IncidentsEmptyState />;
  }

  // Display the incident list
  return (
    <List dense subheader={<ListSubheader>INCIDENTS</ListSubheader>}>
      {incidents!.map((incident, index) => (
        <IncidentListItem
          onIncidentAction={() => getIncidents()}
          key={index}
          incident={incident}
        />
      ))}
    </List>
  );
};
Escalation

Escalation
This component is used to display the list of the persons on-call.
The logic of the component is globally the same as for the incident list.
We will see here how to retrieve and transform the list of users returned by the GET /api-public/v1/oncall/current call.
Here is what the data returned by the Splunk On-Call API looks like:
{
  "teamsOnCall": [
    {
      "team": {
        "name": "string",
        "slug": "string"
      },
      "onCallNow": [
        {
          "escalationPolicy": {
            "name": "string",
            "slug": "string"
          },
          "users": [
            {
              "onCallUser": {
                "username": "string"
              }
            }
          ]
        }
      ]
    }
  ]
}
As we have to return a list with the users, we will filter our teamsOnCall to keep only those that match our current team and we will then retrieve the users within that team:
const { value: userNames, loading, error } = useAsync(async () => {
  const oncalls = await api.getOnCallUsers();
  const teamUsernames = oncalls
    .filter((oncall) => oncall.team?.name === team)
    .flatMap((oncall) =>
      oncall.oncallNow?.flatMap((oncallNow) =>
        oncallNow.users?.flatMap((user) => user?.onCalluser?.username)
      )
    );
  return teamUsernames;
});
Trigger Dialog
This component is used to trigger a new incident to specific users and/or teams.
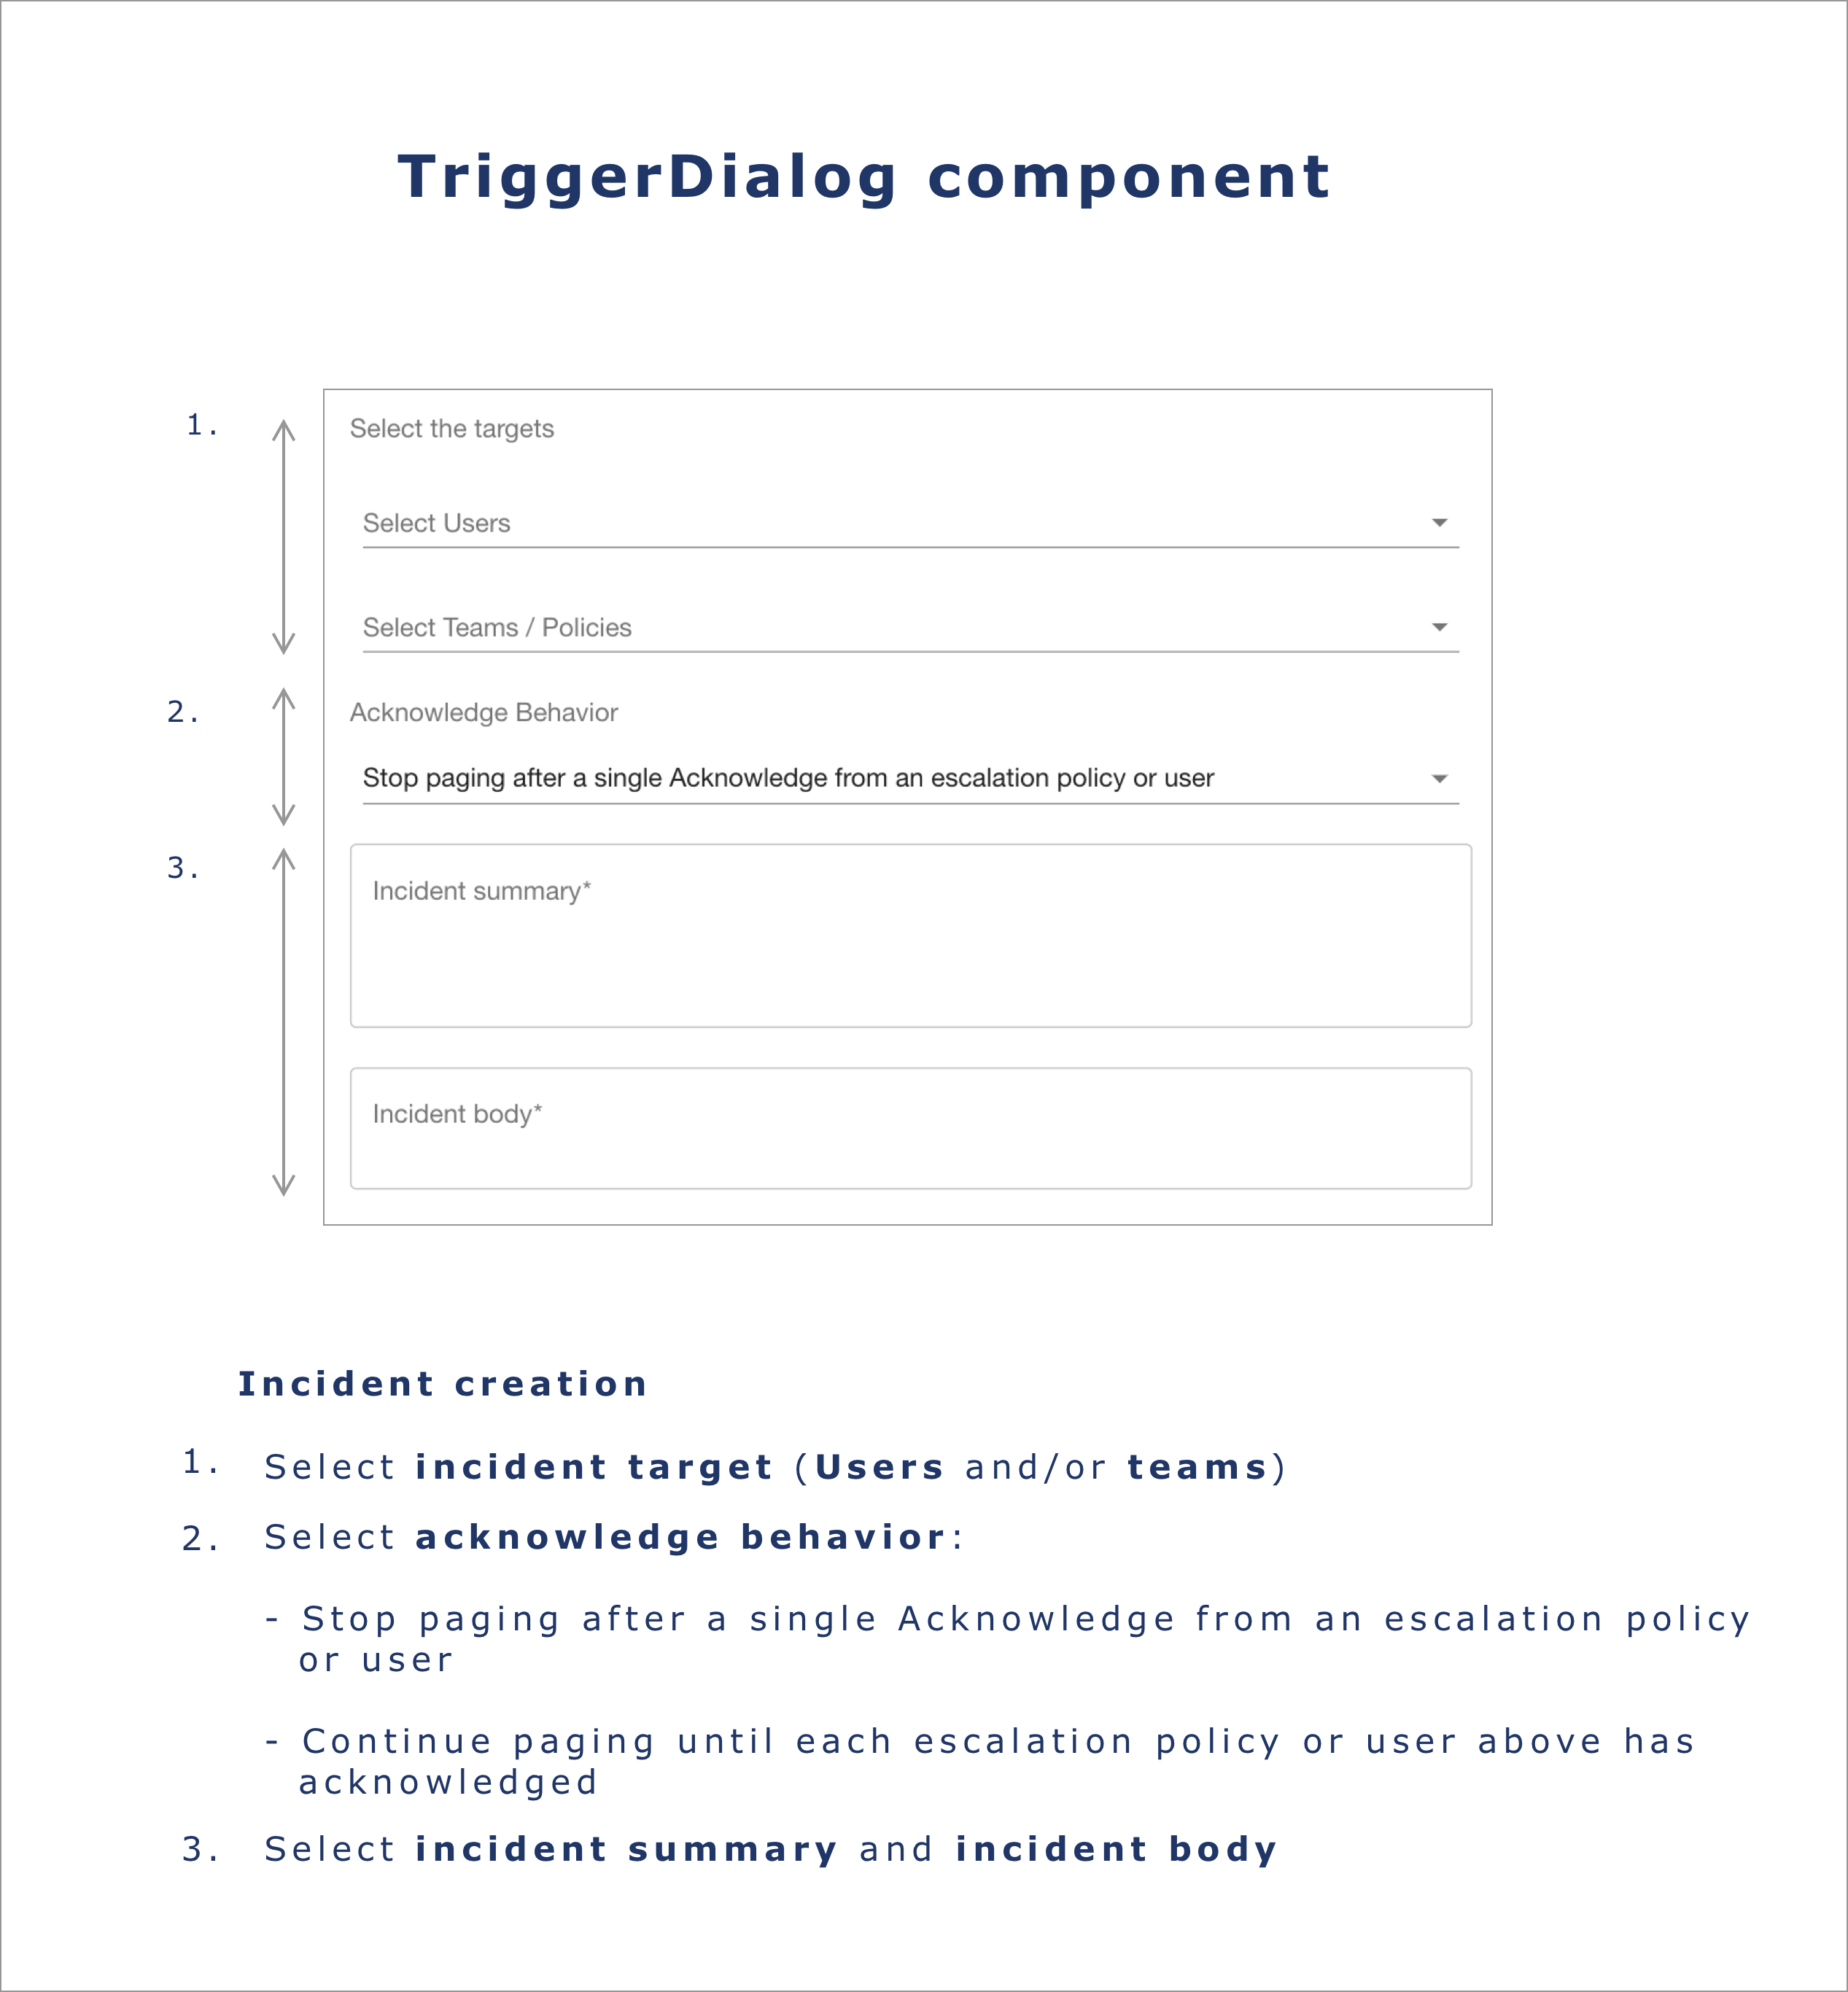
Trigger Dialog
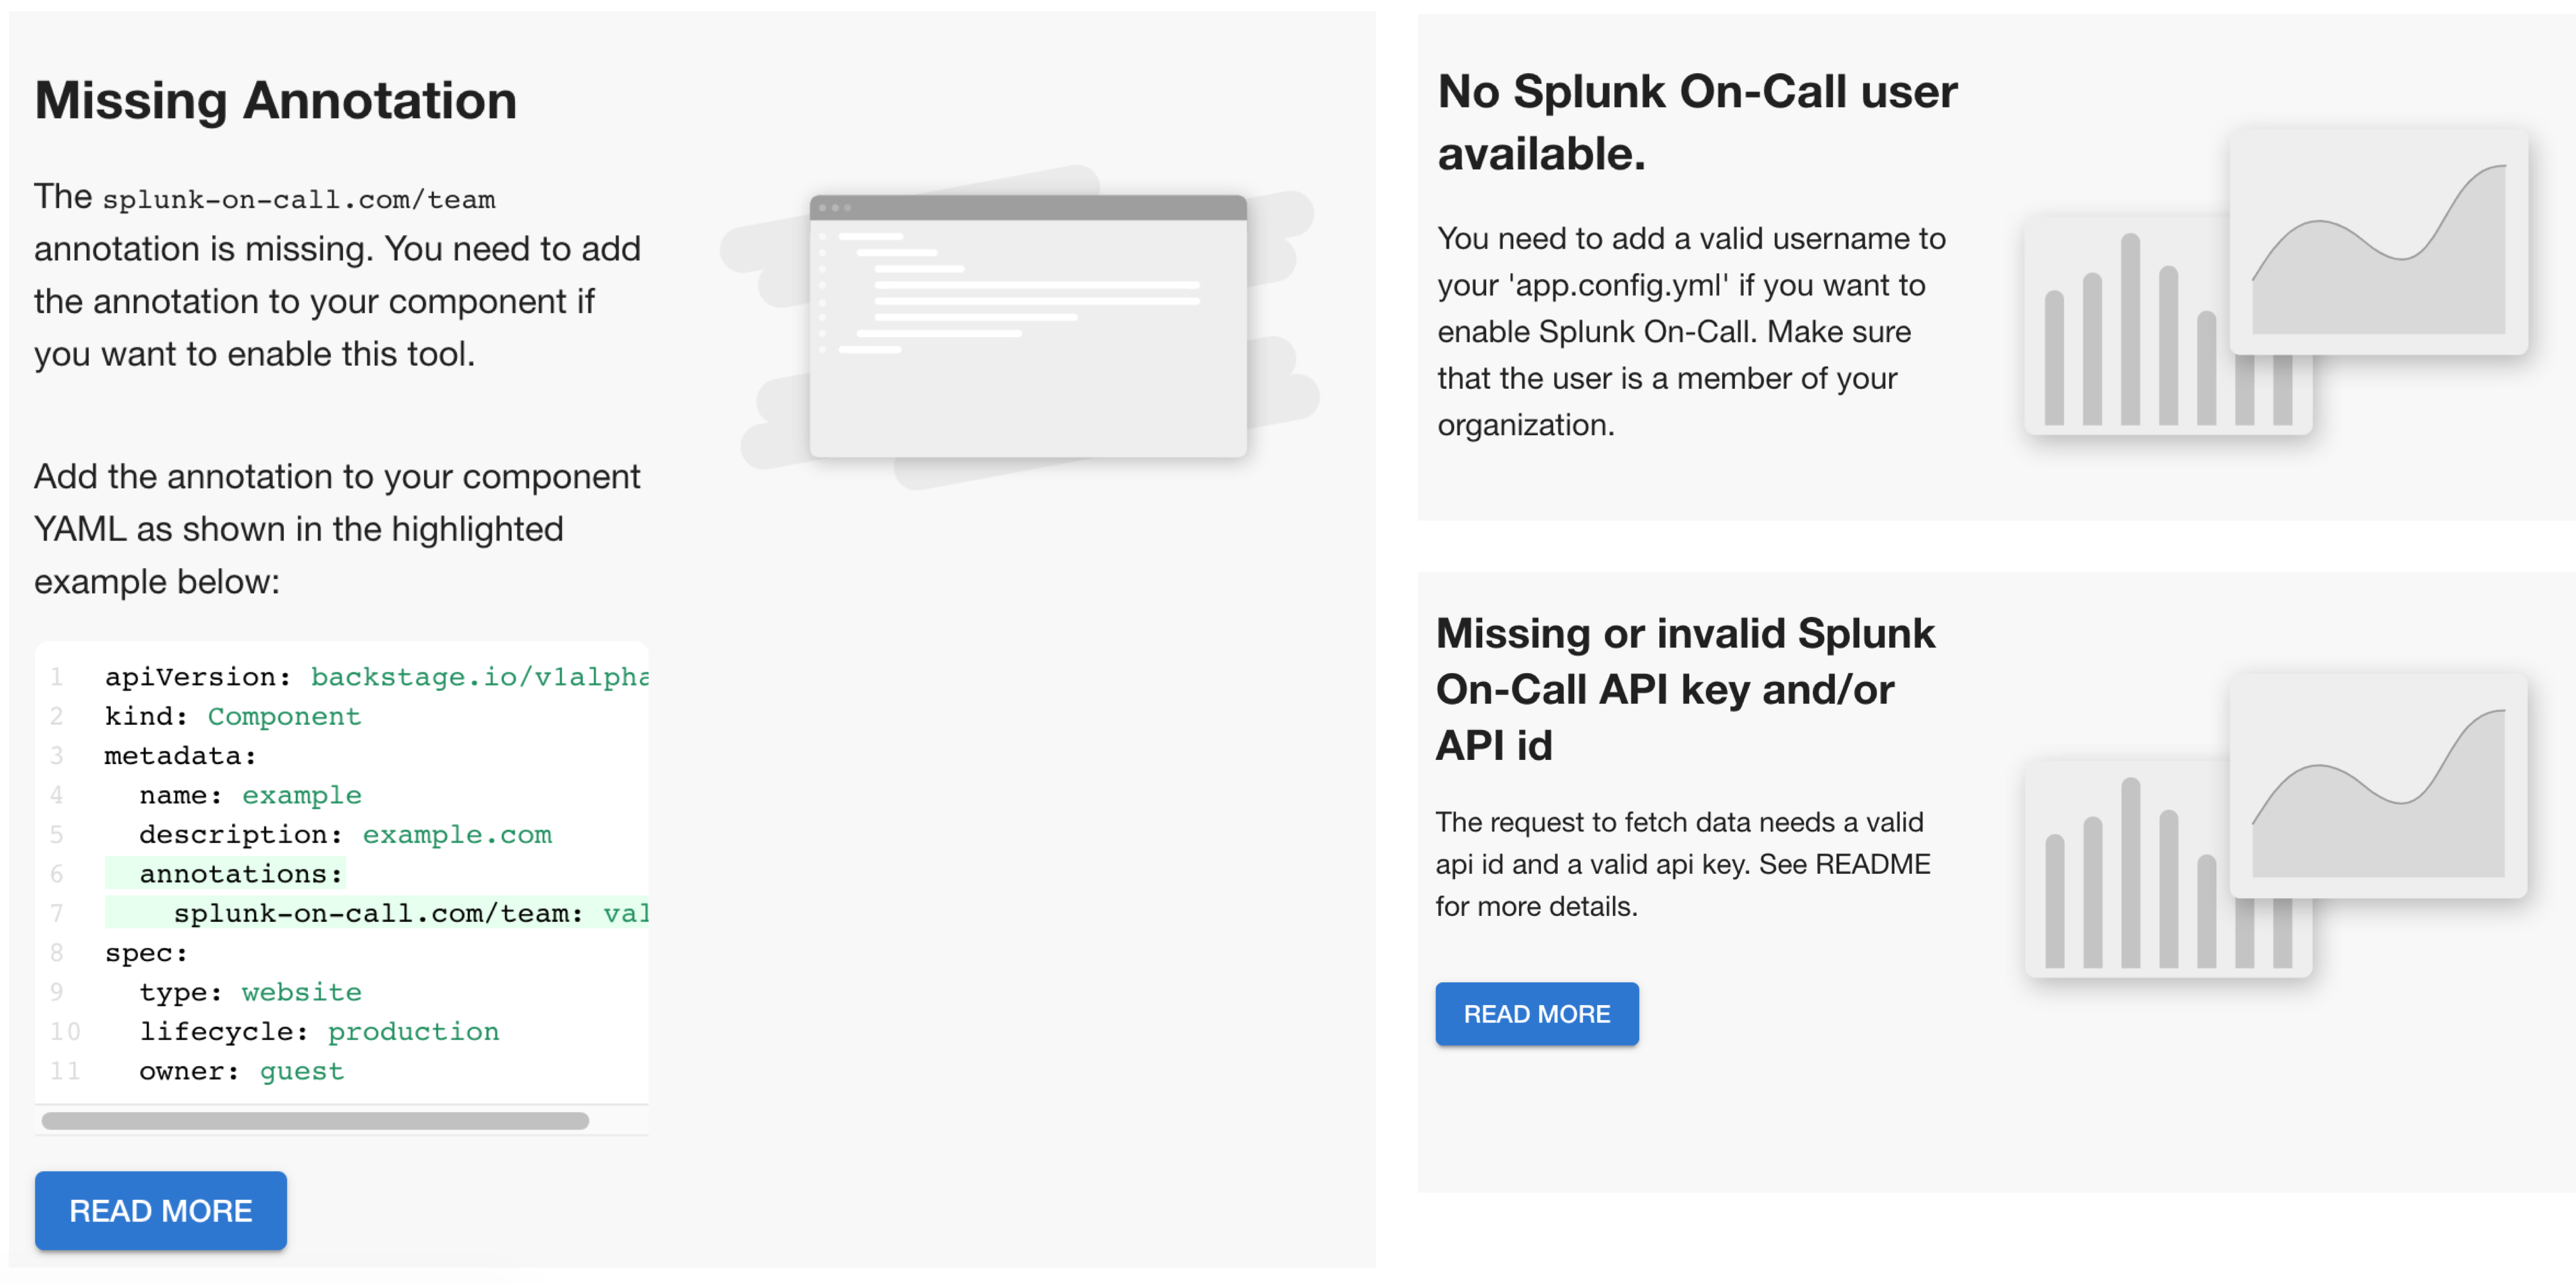
Errors
This component is used to display various errors to the end user.
An error can appear if:
- the Splunk On-Call API_KEY and/or API_ID are not provided
- the Splunk On-Call username is not provided or invalid
- the Splunk On-Call team is not provided
Trigger Dialog
Add the tests
Let's take the example of the Incident component.
Before writing our tests, we need to set up the different mocked apis:
alertApiRef: Core Utility API which is used to report alerts.splunkOnCallApiRef: Splunk On-Call plugin API
We will pass these values to the ApiProvider (an Higher Order Component) which will provide a React Context.Provider with our apis.
const mockSplunkOnCallApi = {
  getIncidents: () => [],
  getTeams: () => [],
};
const apis = ApiRegistry.from([
  [
    alertApiRef,
    createApiRef({
      id: "core.alert",
      description: "Used to report alerts and forward them to the app",
    }),
  ],
  [splunkOnCallApiRef, mockSplunkOnCallApi],
]);
The tests use React Testing library to help testing UI components in a user-centric way.
Empty incident list
We test the case where the list of incidents is empty and we have to display the IncidentsEmptyState component.
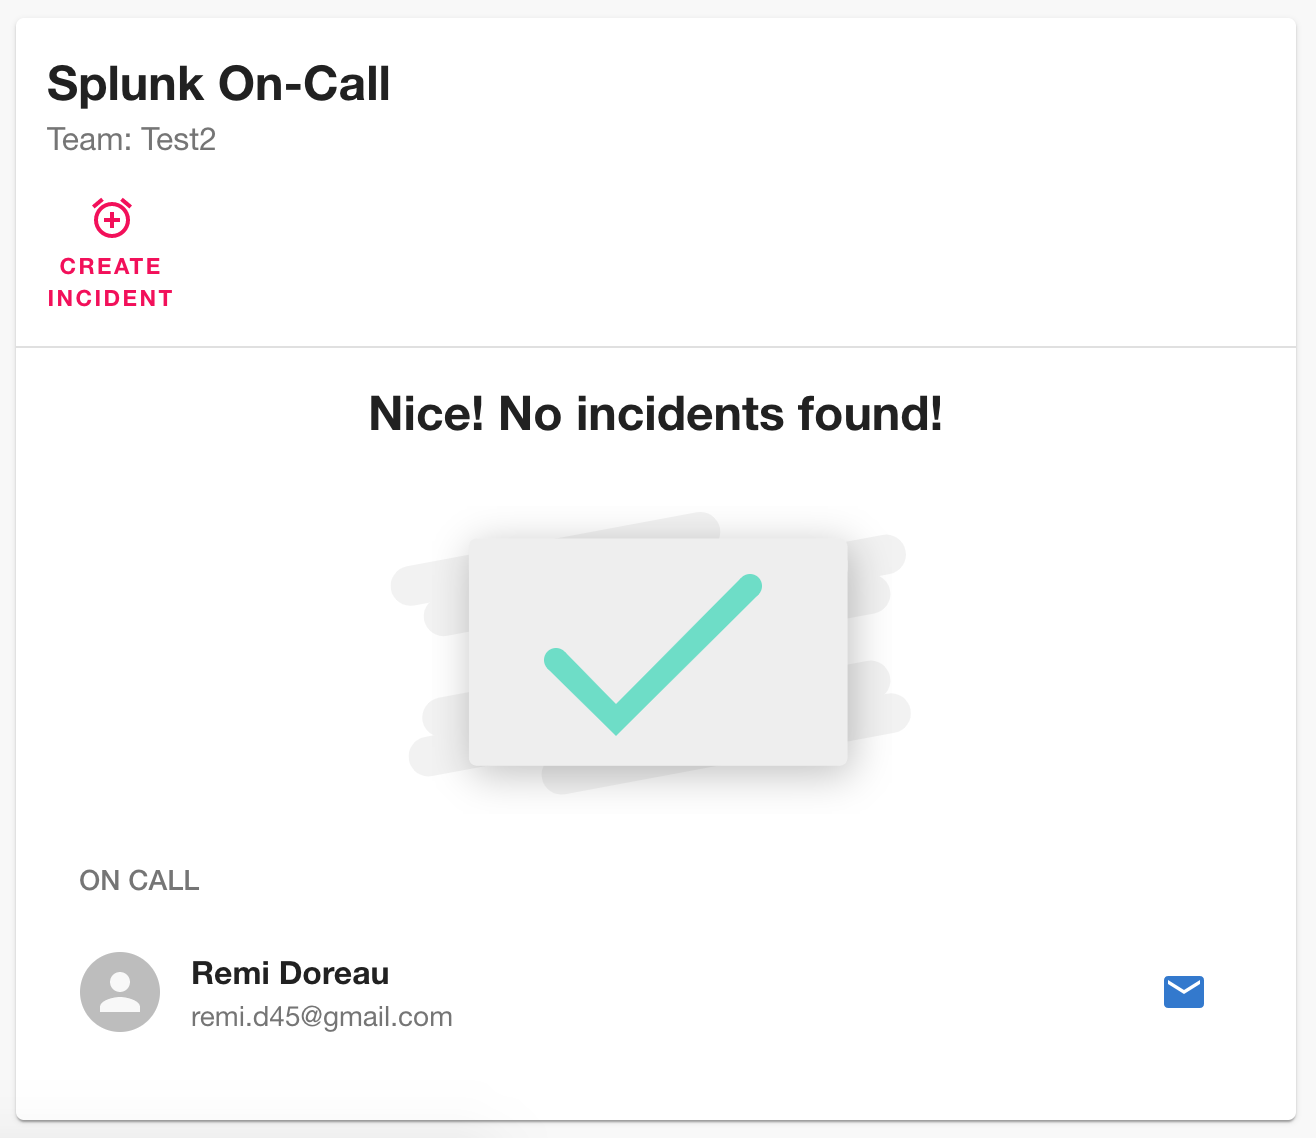
Empty incident list
it("Renders an empty state when there are no incidents", async () => {
  mockSplunkOnCallApi.getTeams = jest
    .fn()
    .mockImplementationOnce(async () => [MOCK_TEAM]);

  const { getByText, queryByTestId } = render(
    wrapInTestApp(
      <ApiProvider apis={apis}>
        <Incidents refreshIncidents={false} team="test" />
      </ApiProvider>
    )
  );
  await waitFor(() => !queryByTestId("progress"));
  expect(getByText("Nice! No incidents found!")).toBeInTheDocument();
});
Valid incident list
We test the case where we have an incident list and the incidents are correctly displayed.
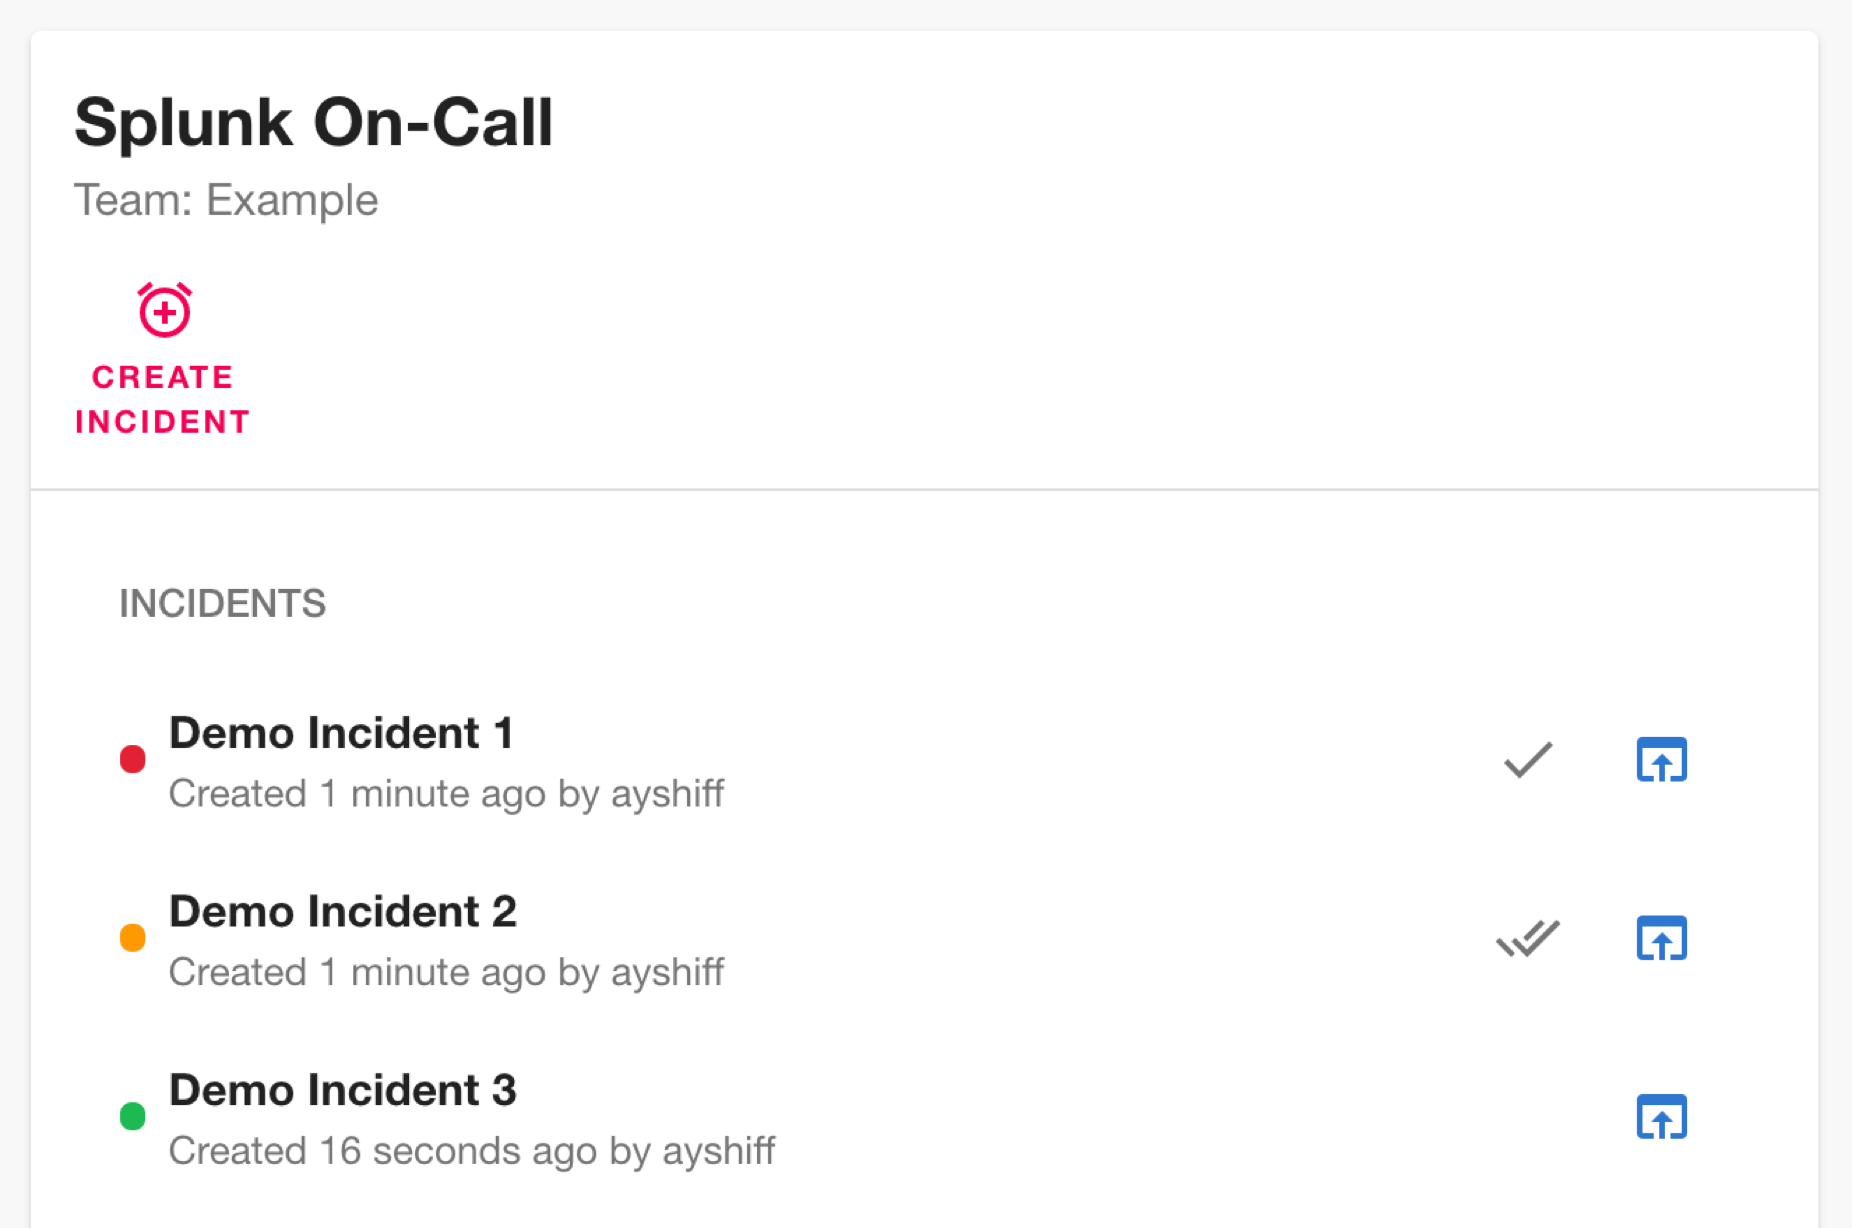
Valid incident list
it("Renders all incidents", async () => {
  mockSplunkOnCallApi.getIncidents = jest
    .fn()
    .mockImplementationOnce(async () => [MOCK_INCIDENT]);
  mockSplunkOnCallApi.getTeams = jest
    .fn()
    .mockImplementationOnce(async () => [MOCK_TEAM]);
  const {
    getByText,
    getByTitle,
    getAllByTitle,
    getByLabelText,
    queryByTestId,
  } = render(
    wrapInTestApp(
      <ApiProvider apis={apis}>
        <Incidents team="test" refreshIncidents={false} />
      </ApiProvider>
    )
  );
  await waitFor(() => !queryByTestId("progress"));
  // Retrieve incident creator name
  expect(
    getByText("user", {
      exact: false,
    })
  ).toBeInTheDocument();
  // Retrieve incident name
  expect(getByText("test-incident")).toBeInTheDocument();
  // Retrieve incident phase
  expect(getByTitle("Acknowledged")).toBeInTheDocument();
  // Retrieve incident phase span
  expect(getByLabelText("Status warning")).toBeInTheDocument();
  // Retrieve incident link
  expect(getAllByTitle("View in Splunk On-Call").length).toEqual(1);
});
Incidents fetching error
We test the case where we have an error while fetching the getIncidents route.
This will trigger the alert API.
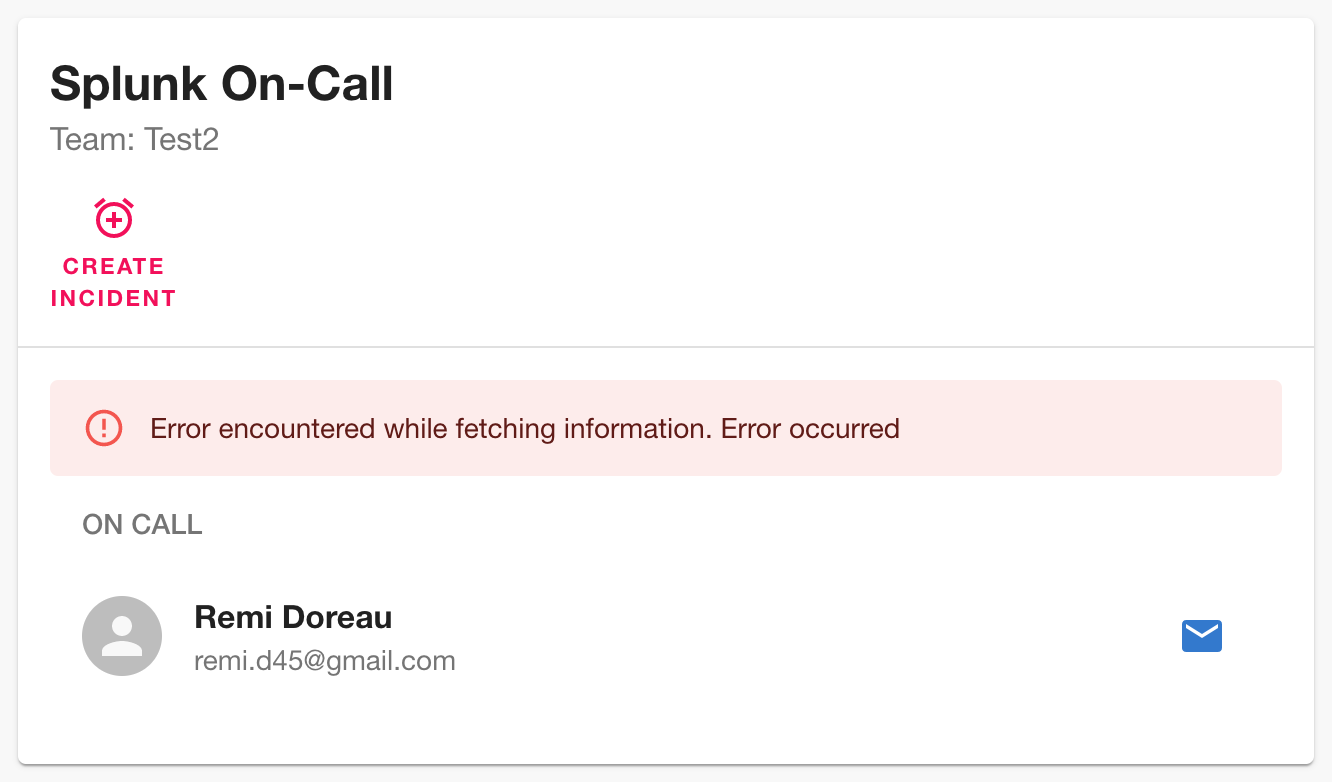
Incidents fetching error
it("Handle errors", async () => {
  // Mock the getIncidents call to throw an error
  mockSplunkOnCallApi.getIncidents = jest
    .fn()
    .mockRejectedValueOnce(new Error("Error occurred"));

  const { getByText, queryByTestId } = render(
    wrapInTestApp(
      <ApiProvider apis={apis}>
        <Incidents team="test" refreshIncidents={false} />
      </ApiProvider>
    )
  );
  await waitFor(() => !queryByTestId("progress"));
  expect(
    getByText("Error encountered while fetching information. Error occurred")
  ).toBeInTheDocument();
});
Add changesets
The final step is to add a changeset which will contains the list of our file changes.
It lets us declare how our changes should be released.
In our case we only have patch changes.
---
'@backstage/plugin-splunk-on-call': patch
---

Added splunk-on-call plugin.
Final result
Here is the final result with a sample workflow:
- Creation of a new incident to the current team
- Acknowledgement of the incident
- Resolution of the incident
- Incident display on the Splunk On-Call dashboard
Takeaway
Problems encountered
I found that there were some inconsistencies in the Splunk On-Call API documentation, especially in the models.
Therefore I had to go back several times on my TypeScript models to fix them.
What did I learn ?
This contribution has allowed me to use an Incident management tool (Splunk On-Call) and to familiarize myself with the creation of plugins for Backstage.
It allowed me to interact with parts of Backstage that I had never contributed to before.