LifeTime - Activity detail
This contribution is a new feature.
Introduction
This contribution combines two things that I love: Meta Languages and time management.
It is for me the opportunity to present you to a language that I particularly like... Reason / ReScript.

LifeTime = ReasonML + calendars
Project
You can find the LifeTime project presentation here.
Context
To understand a little bit more about the solution you need to understand what ReasonML is.
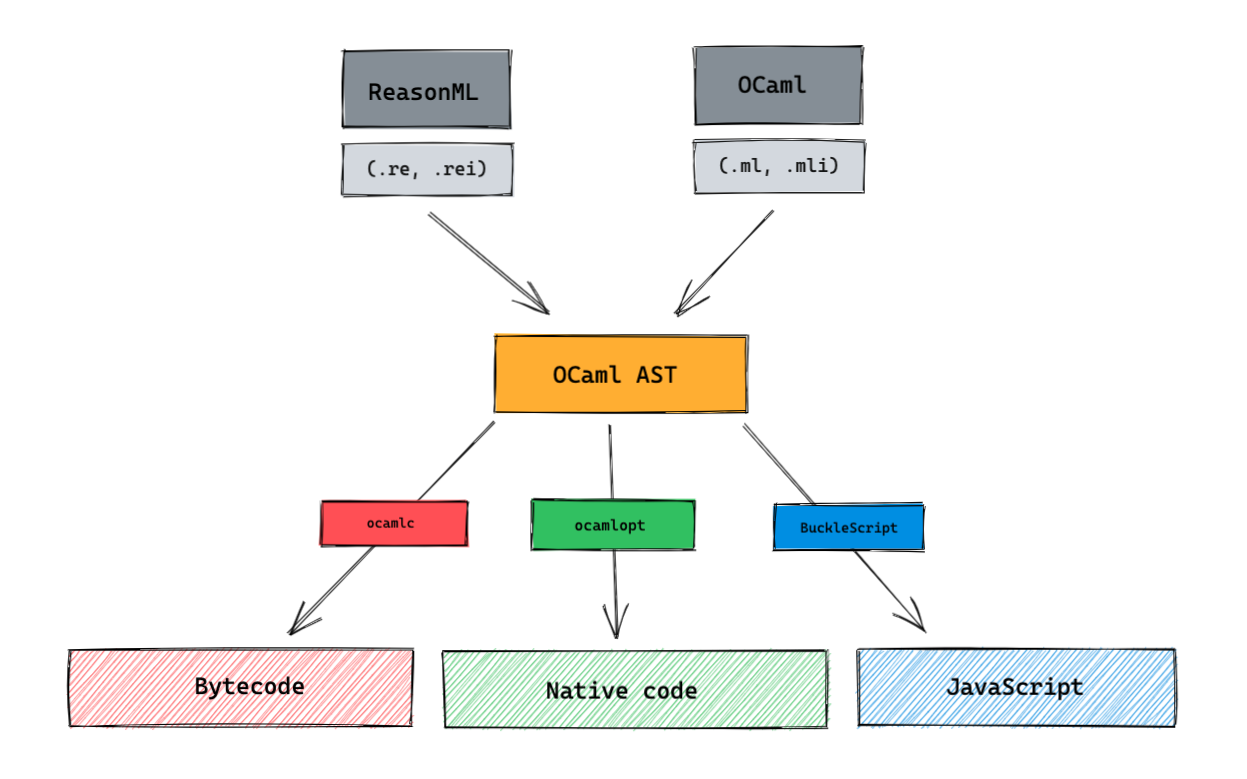
ReasonML is a programming language created at Facebook and powered by OCaml.
It is a new syntax for the programming language OCaml. Anything possible in OCaml is possible in Reason!
It means that we can benefit from the OCaml solid type-system.
The idea behind Reason is pretty simple: if it compiles it will works! (99% of the time)
Here is a schema showing how ReasonML fits in the OCaml ecosystem.
In this project we will use some Reason bindings reason-react-native to allow to use Reason with ReasonReact (which will be used to create our React components) to make our mobile app.
The story of Messenger.com
On September 8, 2017 the team at Facebook working on ReasonML published a post where they explain that 50% of Messenger.com (the web version of Facebook Messenger) codebase was converted to Reason code.
Here are some benefits they noticed:
- Build of the entire Reason part of the codebase is ~2s (several hundred files)
- Bug reports has decreased (from a few one per day to 10 bugs a year)
- Refactors are faster and introduce fewer bugs
Current behavior
Let's go back to our project.
Currently when a User launches the app, he arrives on the Home screen with:
- the weekly chart: displaying the week activities average
- the top activities list: displaying in descending order the activities with the most time
When the User tap on an activity, he goes to the associated Activity detail screen with:
- the activity category list where he can choose the type of the activity
- the possibility to hide/show the activity
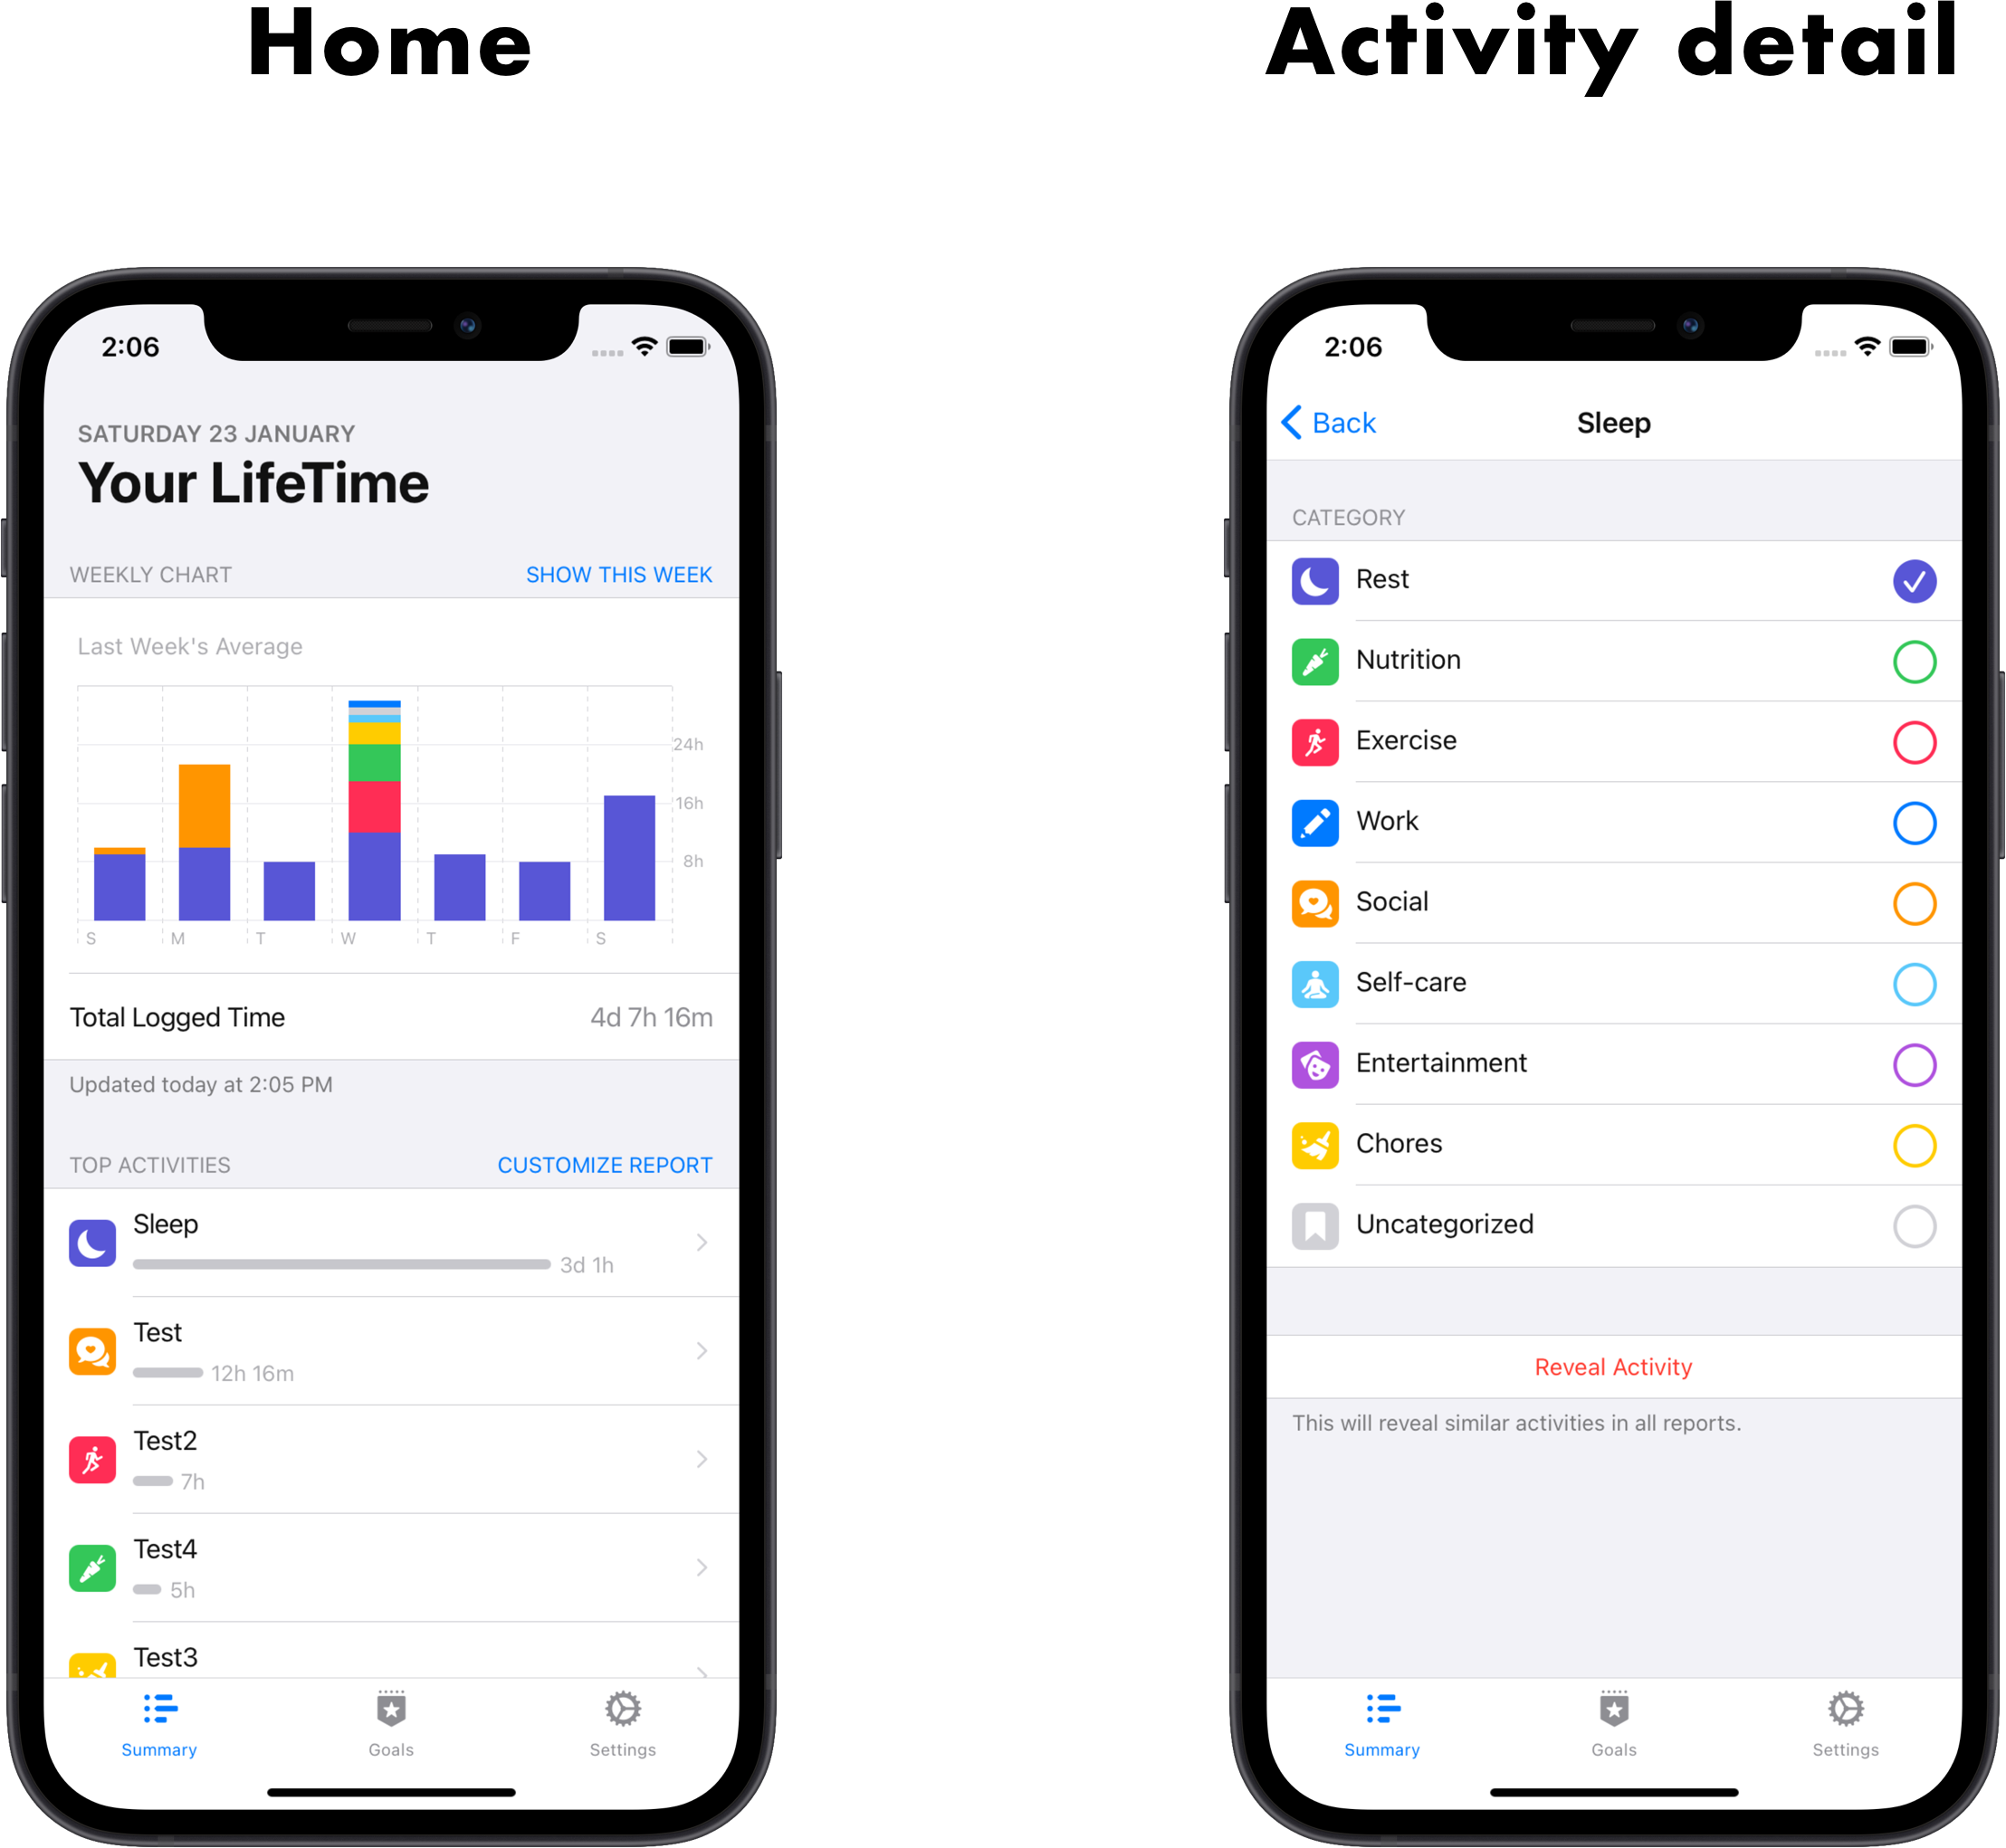
Home + Activity detail screens
The goal of the contribution is to add to this screen:
- an event list containing all the events of the activity
- a graph showing the different events
Implement the solution
The code blocks are intentionally incomplete for the sake of readability.
If you want to read the full code you'll find it in the PR link at the top.
The idea is pretty straightforward, here are the user stories:
As a User I want to see the events of the week I was on the home page so that I can directly see more details about the current week.
- Find a way to keep the week currently viewed on the home screen
- Fetch the events related to this week
As a User I want to be able to switch between the 5 last weeks so that I can see the events related to the week that I want.
- Implement the graph: the events fetch will be triggered when the user will swipe between the weeks
As a User I want to see the events list of the current week so that I can see more details about the events.
- Implement the events list
1. Fetch the events
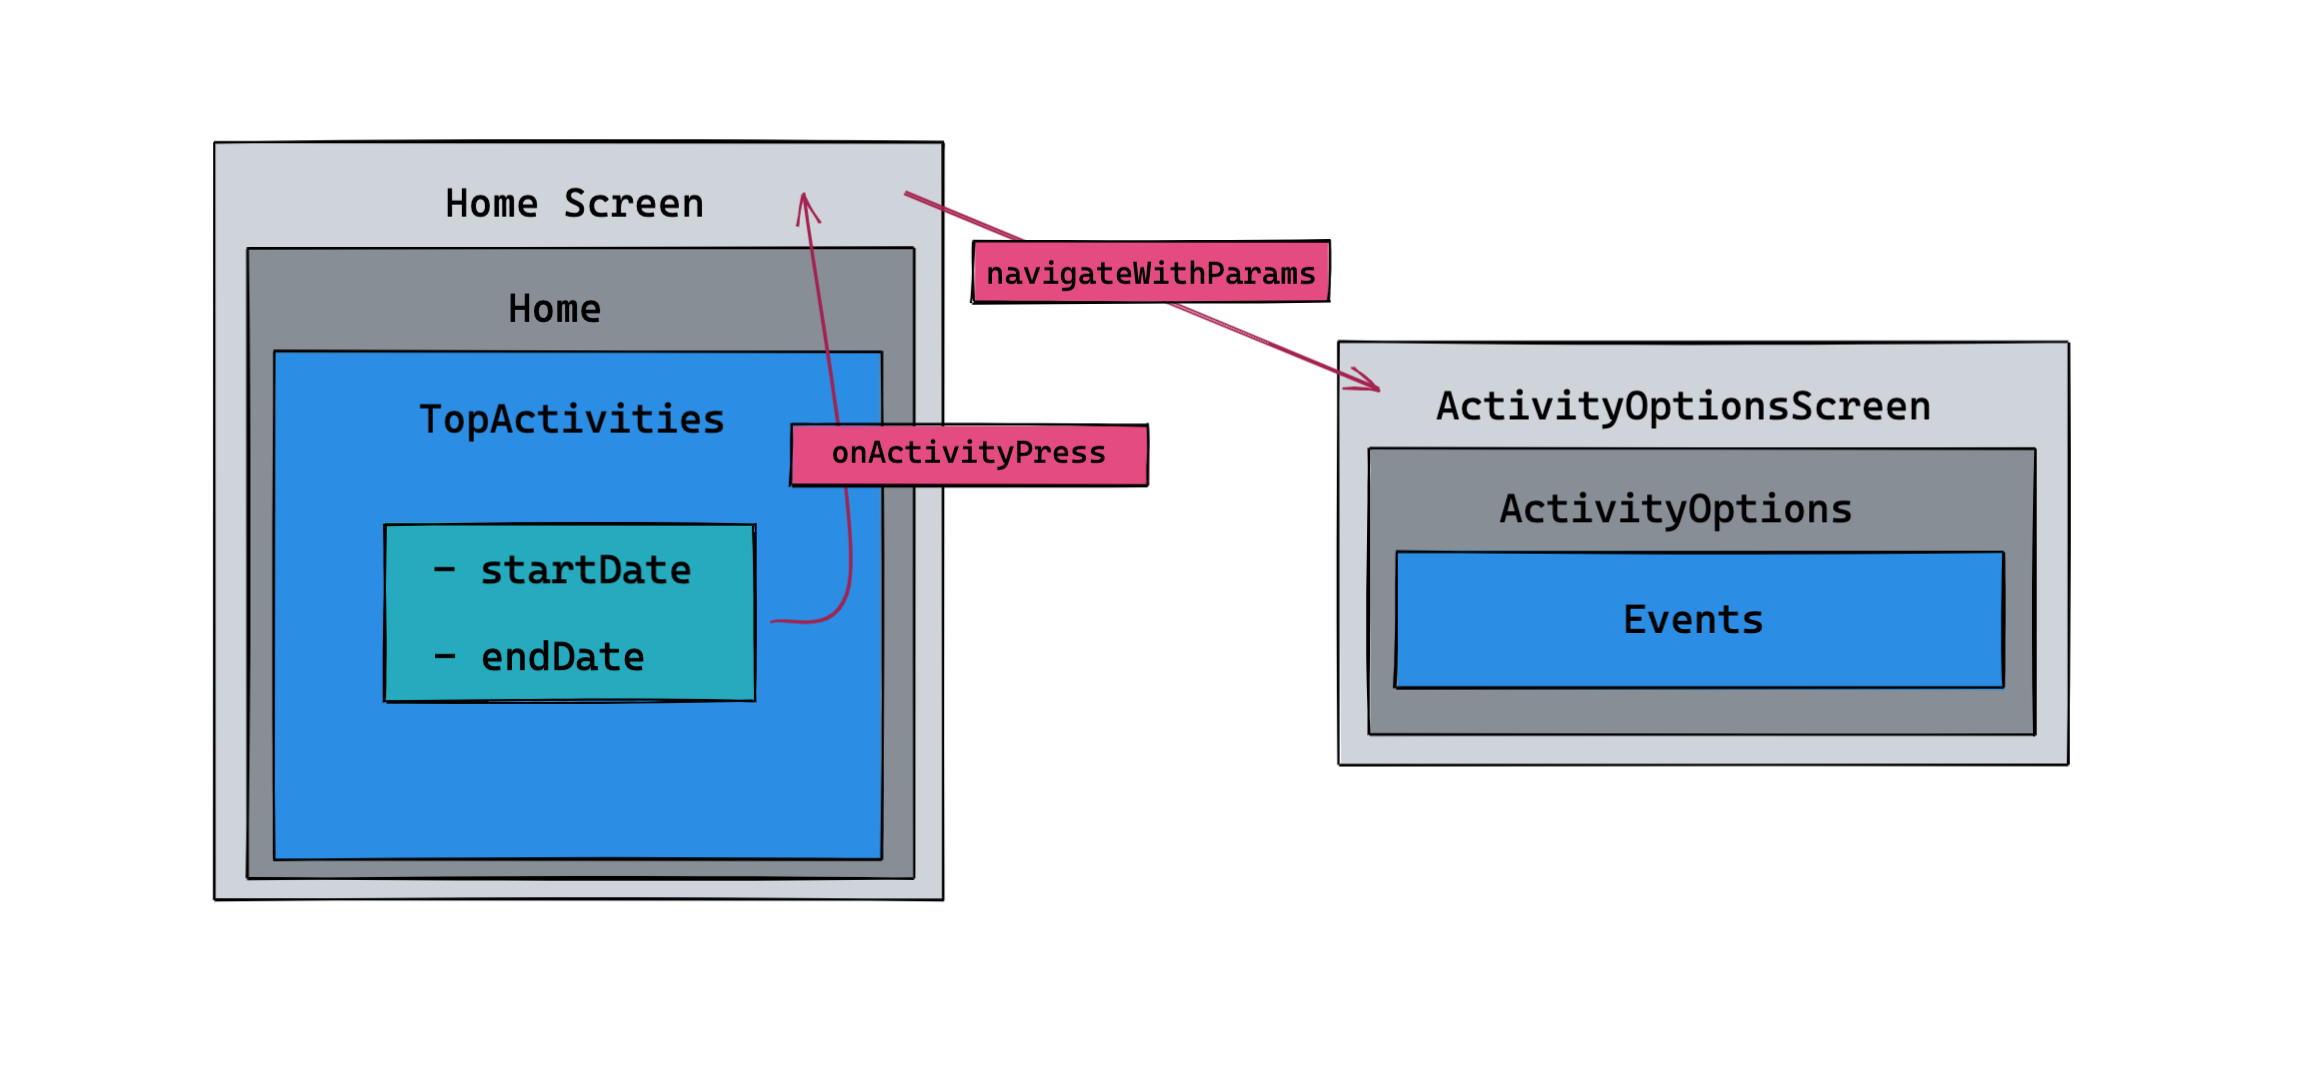
Before fetching the events, we need to know from which week we'll fetch them.
To do so, the TopActivites component (which is responsible for showing the activities) will need to know the current week the user is on.
When the user will tap an activity from the Home screen, we will pass to the Activity Detail Screen the current week information: the week start date and the week end date.
Here is a schema to show you the logic and the file hierarchy:
<TopActivities
  mapTitleDuration
  onFiltersPress
  onActivityPress
  startDate
  endDate
/>
<TouchableOpacity
  key=title
  onPress={_ =>
    onActivityPress(
      title,
      (startDate, endDate),
    )}>
<Home
  refreshing
  onRefreshDone
  onGetStarted={() =>
    navigation->Navigators.RootStack.Navigation.navigate("HelpModalScreen")}
  onFiltersPress={() =>
    navigation->Navigators.RootStack.Navigation.navigate("FiltersModalScreen")}
  onActivityPress={(activity, week) => {
    let (start, end) = week
    navigation->Navigators.StatsStack.Navigation.navigateWithParams(
      "ActivityOptionsScreen",
      {
        currentActivityTitle: Some(activity),
        currentWeek: (start->Js.Date.toString, end->Js.Date.toString),
      },
    )
  }}
/>
let make = (
  ~activityTitle,
  ~refreshing,
  ~onRefreshDone,
  ~onSkipActivity,
  ~currentWeek: (string, string),
) => {
// ...
  let ((startDate, supposedEndDate), currentDates_set) = React.useState(() => {
    let (start, end) = currentWeek
    (start->Js.Date.fromString, end->Js.Date.fromString)
  })
// ...
}
Now that we have our initial week we can fetch our events.
We will see the implementation of the getEvents function later.
let events =
  getEvents(startDate, endDate, true)
  ->Option.map(event =>
    event->Calendars.filterEventsByTitle(activityTitle)->Calendars.sortEventsByDecreasingStartDate
  )
  ->Option.getWithDefault([])
Here are the helpers:
filterEventsByTitle: used to filter the events according to their titlesortEventsByDecreasingStartDate: used to sort the events from the most recent to the oldest
let filterEventsByTitle = (
  events: array<ReactNativeCalendarEvents.calendarEventReadable>,
  title: string,
) => events->Array.keep(evt => evt.title == title)

let sortEventsByDecreasingStartDate = (
  events: array<ReactNativeCalendarEvents.calendarEventReadable>,
) => events->SortArray.stableSortBy((a, b) =>
    a.startDate->Js.Date.fromString->Js.Date.getTime <
      b.startDate->Js.Date.fromString->Js.Date.getTime
      ? 1
      : switch a.startDate->Js.Date.fromString->Js.Date.getTime >
          b.startDate->Js.Date.fromString->Js.Date.getTime {
        | true => -1
        | false => 0
        }
  )
This is for the initial events fetch when the user arrives on the activity detail screen.
We will see below how to fetch the events when the user changes week or trigger the refresh.
Pull to Refresh
The user can refresh the data by pulling down the current screen.
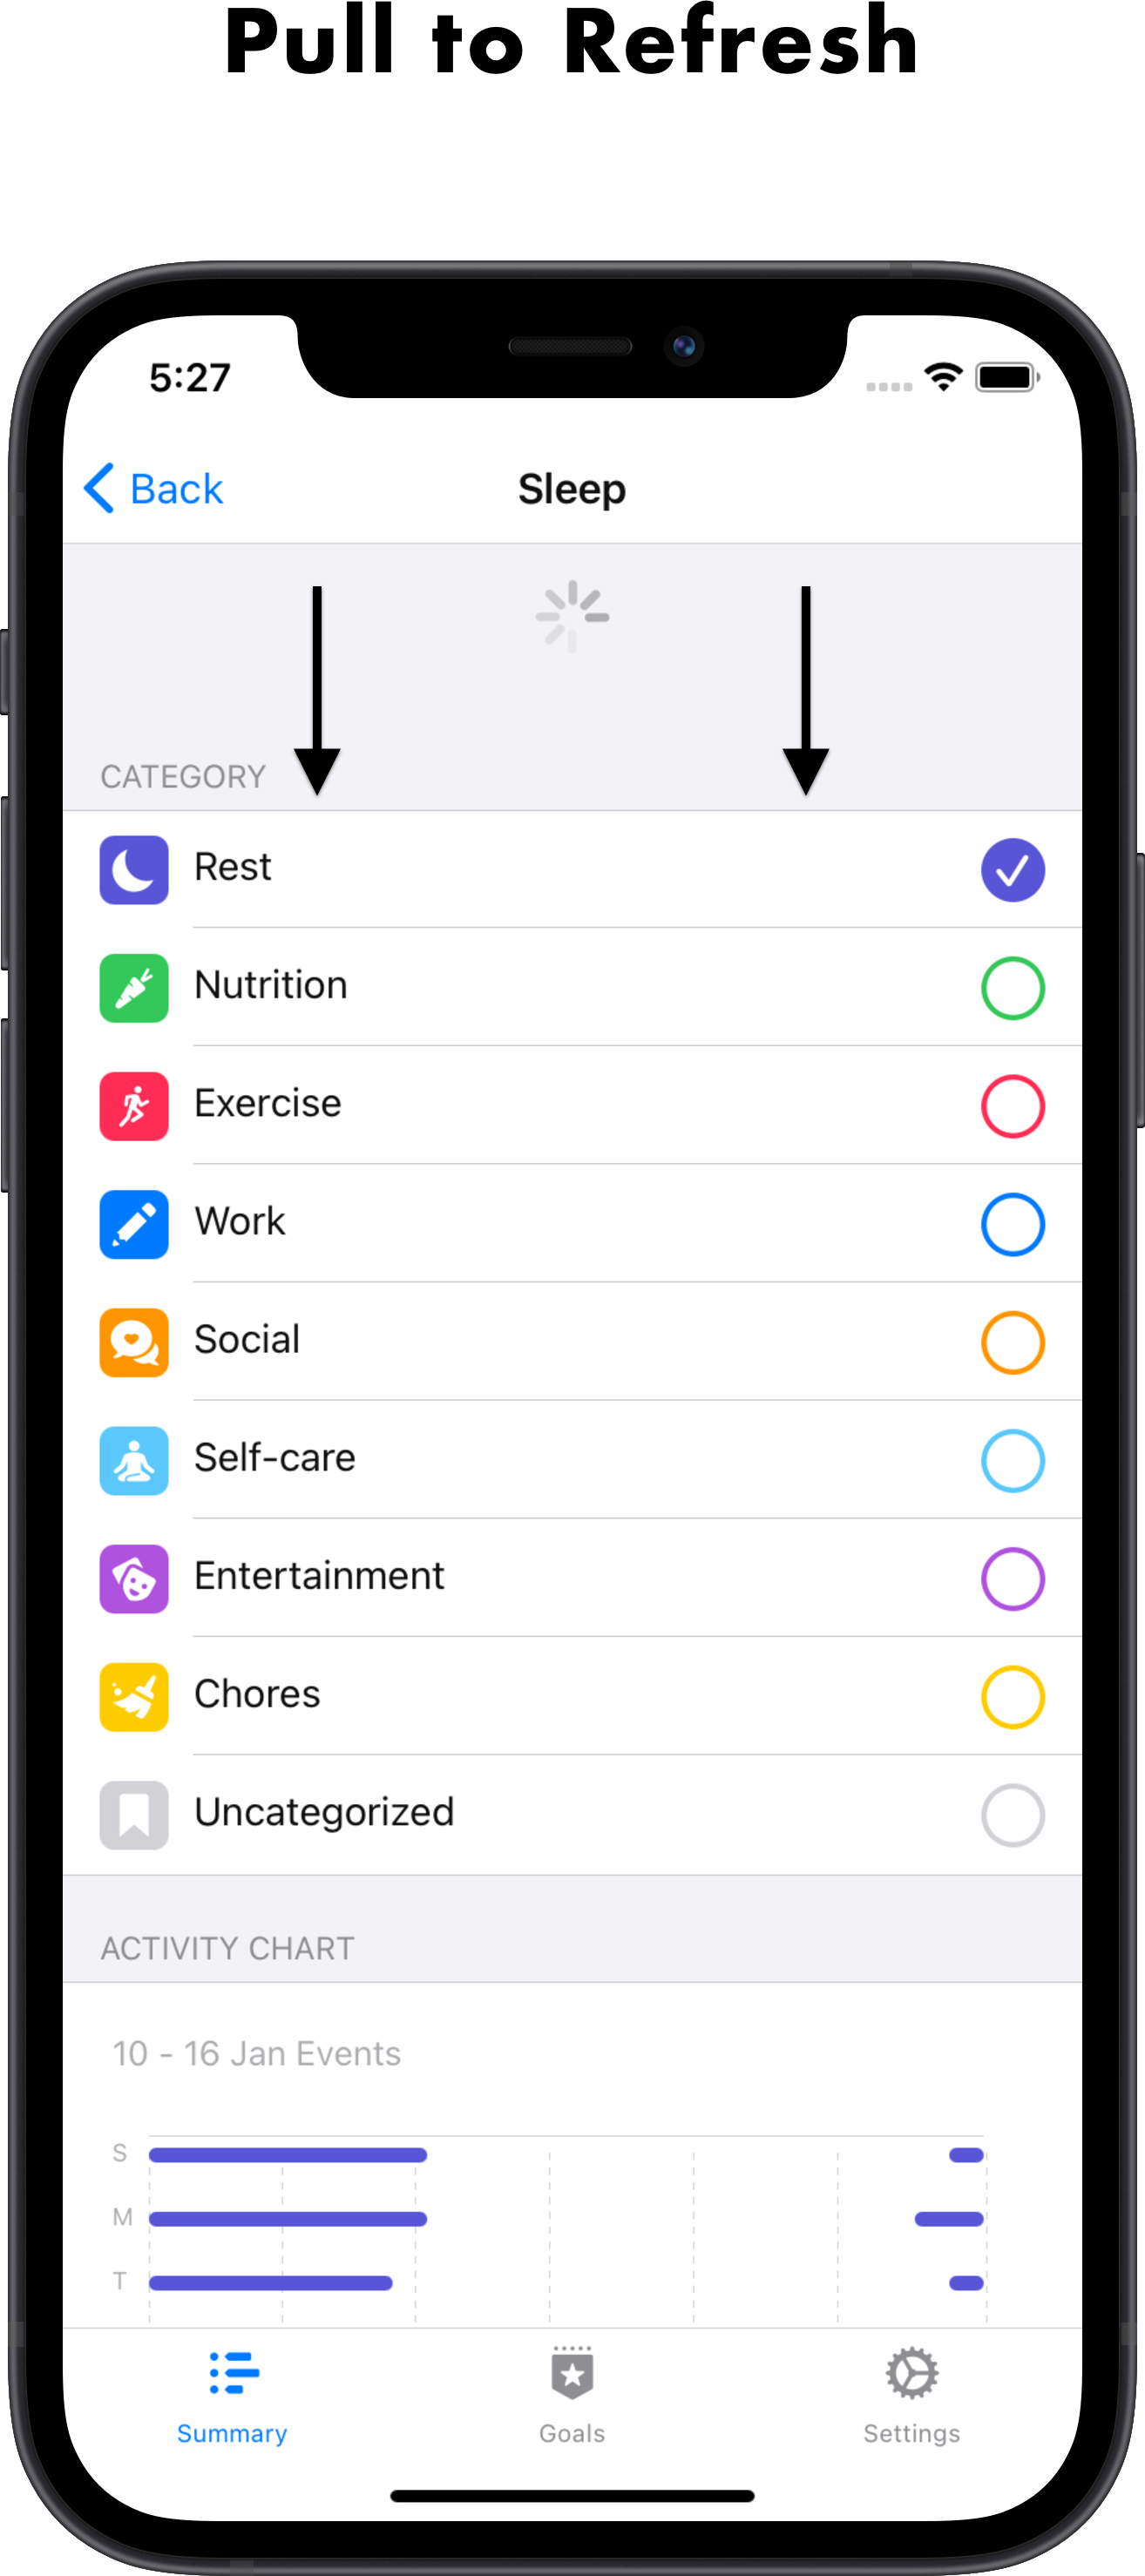
In the screen component, we will add three things:
refreshingstate which will tell if the component is reloadingonRefreshcallback which will be triggered when the user will pull down- sets the
refreshingstate totrue
- sets the
onRefreshDonecallback which will be triggered once the user has finished pulling down- sets the
refreshingstate tofalse
- sets the
let (refreshing, refreshing_set) = React.useState(() => false)
let onRefresh = React.useCallback1(() => refreshing_set(_ => true), [refreshing_set])
let onRefreshDone = React.useCallback1(() => refreshing_set(_ => false), [refreshing_set])
// ...
<ActivityOptions
  refreshing
  onRefreshDone
  activityTitle=currentActivityTitle
  currentWeek=params.currentWeek
  onSkipActivity={() => navigation->Navigators.RootStack.Navigation.goBack()}
/>
Once we have set up our parent component, all that remains is for us to react to the different values of the parent's props in the child component in a useEffect.
React.useEffect3(() => {
  if refreshing {
    requestUpdate()
    onRefreshDone()
  }
  None
}, (refreshing, requestUpdate, onRefreshDone))
/>
2. Add the events graph
We will display the events in the form of a chronogram.
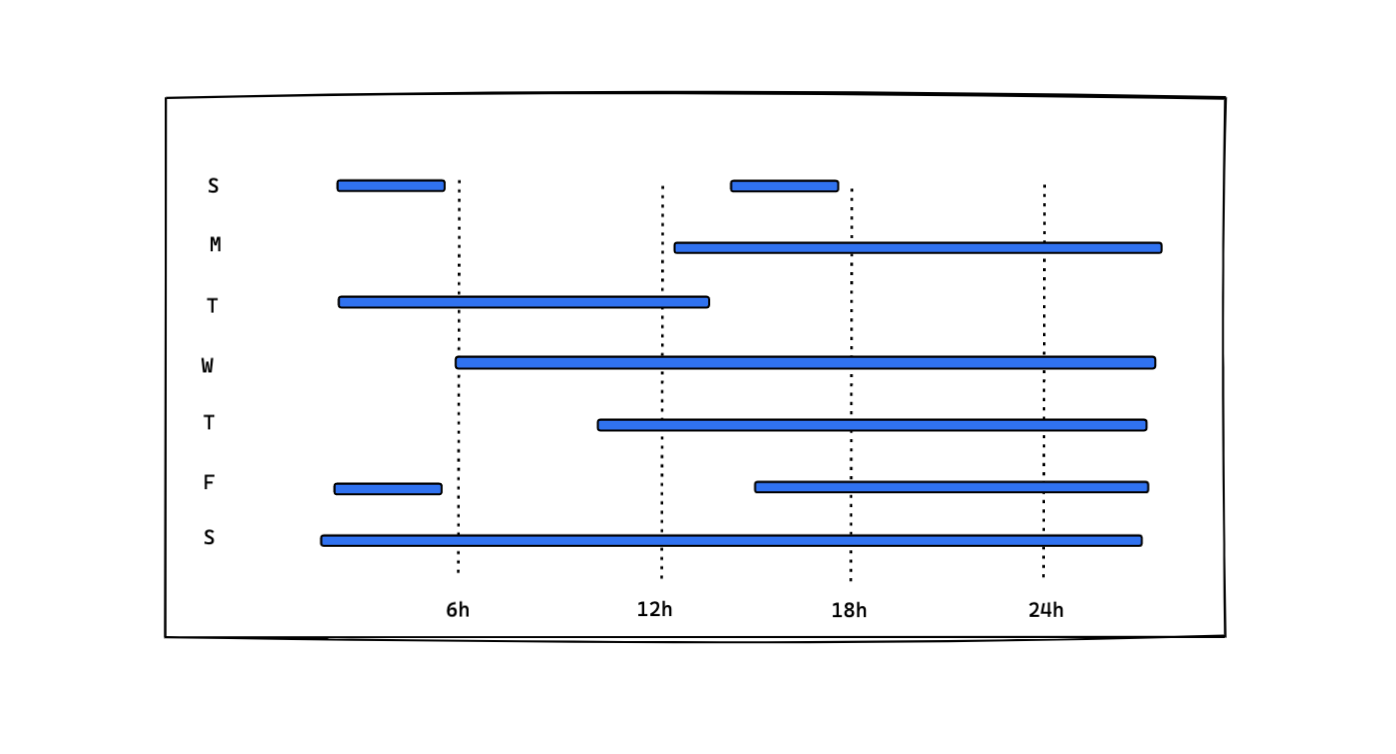
This chronogram will be used to display all the events day by day.
When the user changes the current week, we will update startDate and supposedEndDate seen above (1. Fetch the events).
onViewableItemsChanged will trigger the events fetch with the new week range.
let onViewableItemsChanged = React.useRef(itemsChanged =>
  if itemsChanged.viewableItems->Array.length == 1 {
    itemsChanged.viewableItems[0]
    ->Option.map(wrapper => currentDates_set(_ => wrapper.item))
    ->ignore
  }
).current
// ...
<FlatList
  // ...
  onViewableItemsChanged
/>
Every time events are fetched, the results are stored in a Map with (startDate, endDate).
When we don't allow the function to fetch new events, it will look in the Map to see if the values has already been fetched and if so it will return the events.
You can see this like a store for our events.
Calendars - getEvents
let getEvents = React.useCallback2((startDate, endDate, allowFetch) => {
  let res = eventsMapByRange->Map.String.get(makeMapKey(startDate, endDate))
  if res->Option.isNone {
    let res = eventsMapByRange->Map.String.get(makeMapKey(startDate, endDate))
    if res->Option.isNone && allowFetch {
      fetchAllEvents(
        startDate->Js.Date.toISOString,
        endDate->Js.Date.toISOString,
        // we filter calendar later cause if you UNSELECT ALL
        // this `fetchAllEvents` DEFAULT TO ALL
        None,
      )
      ->FutureJs.fromPromise(error => {
        // @todo error!
        Js.log(error)
        // setEventsMapByRange(eventsMapByRange => {
        //   eventsMapByRange->Map.String.set(
        //     makeMapKey(startDate, endDate),
        //     None,
        //   )
        // });
        error
      })
      ->Future.tapOk(res =>
        setEventsMapByRange(eventsMapByRange =>
          eventsMapByRange->Map.String.set(makeMapKey(startDate, endDate), Some(res))
        )
      )
      ->ignore
      ()
    }
  }
  res->Option.flatMap(res => res)
}, (eventsMapByRange, setEventsMapByRange))
(getEvents, updatedAt, requestUpdate)
}
As we have already fetched our events in the parent component ActivityOptions, we'll need to retrieve the events already fetched.
To do so, we will set the boolean argument allowFetch (3rd argument of getEvents) to false.
@react.component
let make = (
  ~today: Js.Date.t,
  ~todayFirst,
  ~previousFirst,
  ~startDate,
  ~supposedEndDate,
  ~activityTitle,
  ~style,
) => {
  let (settings, _setSettings) = React.useContext(AppSettings.context)
  let (getEvents, _updatedAt, _requestUpdate) = React.useContext(Calendars.context)

  let endDate = supposedEndDate->Date.min(today)
  let events =
    getEvents(startDate, endDate, false)
    ->Option.map(event => event->filterEventsByTitle(activityTitle))
    ->Option.getWithDefault([])

  let categoryId = settings->Calendars.categoryIdFromActivityTitle(activityTitle)

  <WeeklyGraphDetail events startDate supposedEndDate categoryId />
}
Now we are going to process our data in order to adapt it to our graph.
We need to group events that occur on the same day together.
To do so, we will compute a matrix thanks to the function eventsPerDate which will return our data in the form: (date, (event1, event2...)...)
This function iterates through all the days of the week and tests against the events if it overlaps with the current day.
Note: We also have to handle the case where an event starts on a day and ends the next day.
This is the reason why we do Date.max(startOfDate) and Date.min(endOfDate) in code sample bellow.
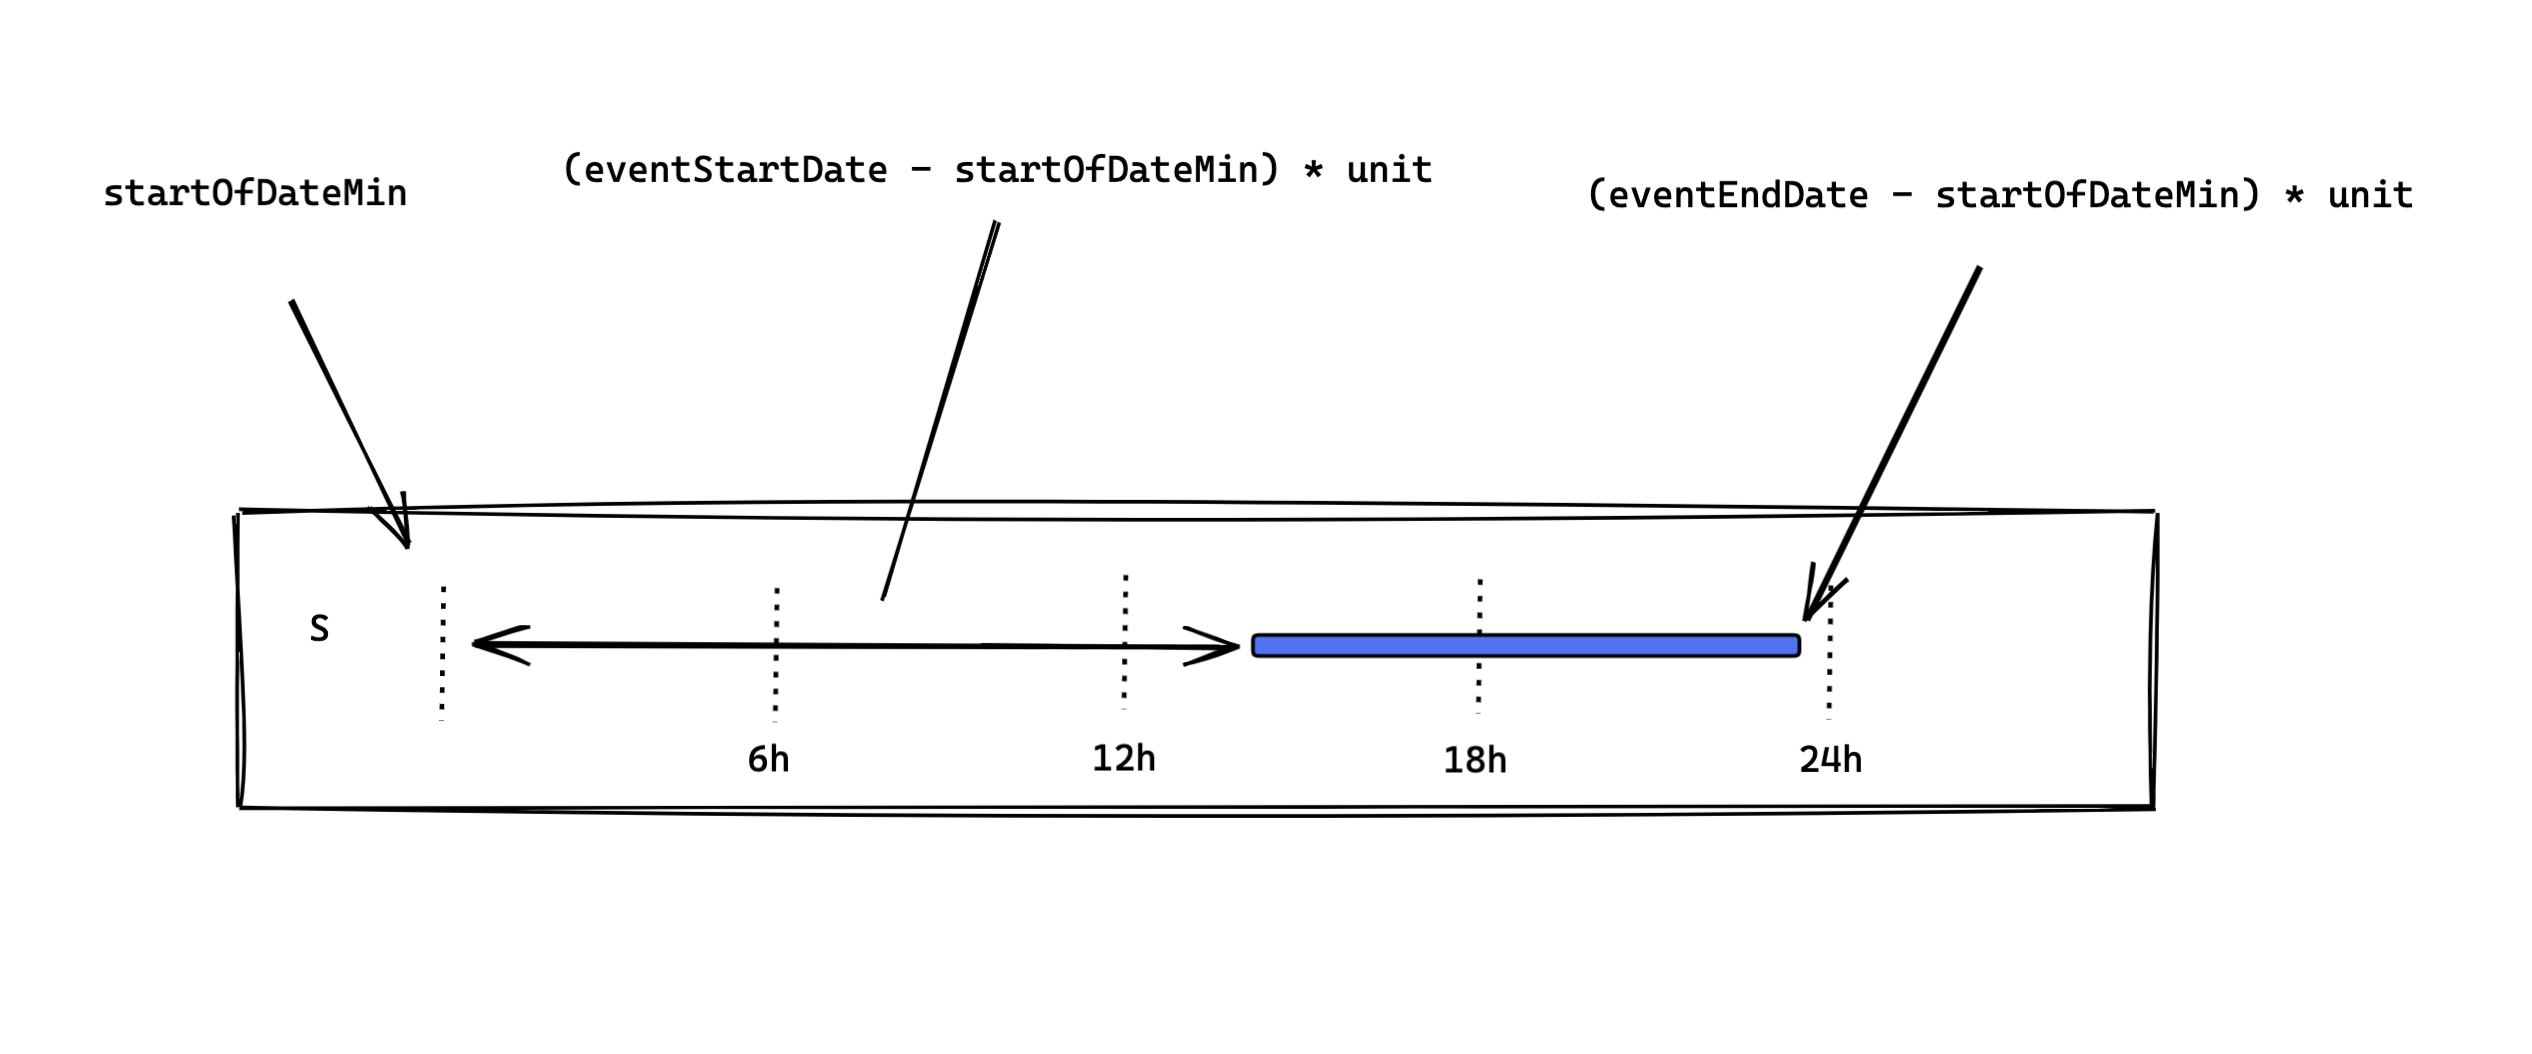
For each event we compute the starting point and the ending point of the time range.
There is 24 x 60 = 1440min within a day.
We know the available width for our graph, so we can compute a unit which will correspond to 1 minute in our timeline.
We can now put our ranges in our graph.
let slices = 6
let graphHeight = 160.
let graphLetterHeight = 16.

let (settings, _setSettings) = React.useContext(AppSettings.context)

let theme = Theme.useTheme(AppSettings.useTheme())

// Get the activity color
let (_, _, colorName, _) = ActivityCategories.getFromId(categoryId)
let backgroundColor = colorName->ActivityCategories.getColor(theme.mode)

// Computes the different dates of our week
let supposedNumberOfDays = Date.durationInMs(startDate, supposedEndDate)->Date.msToDays
let dates =
  Array.range(0, supposedNumberOfDays->int_of_float)->Array.map(n =>
    startDate->DateFns.addDays(n->Js.Int.toFloat)
  )

let eventsPerDate = React.useMemo4(() => {
  let events = events->Calendars.filterEvents(settings)
  let minutesInDay = 1440.
  let minUnit = width /. minutesInDay
  dates->Array.map(date => {
    let startOfDate = date->Date.startOfDay
    let startOfDateMin = date->Date.startOfDay->Js.Date.getTime->Date.msToMin
    let endOfDate = date->Date.endOfDay
    (date, events->Array.map(evt => {
        if (
          Date.hasOverlap(
            evt.startDate->Js.Date.fromString,
            evt.endDate->Js.Date.fromString,
            date,
          )
        ) {
          let start =
            (evt.startDate
            ->Js.Date.fromString
            ->Date.max(startOfDate)
            ->Js.Date.getTime
            ->Date.msToMin -. startOfDateMin) *. minUnit
          let end =
            (evt.endDate
            ->Js.Date.fromString
            ->Date.min(endOfDate)
            ->Js.Date.getTime
            ->Date.msToMin -. startOfDateMin) *. minUnit
          (evt.id, start, end)
        } else {
          ("", 0., 0.)
        }
      })->Array.keep(((id, _, _)) => id != ""))
  })
}, (events, settings, dates, width))
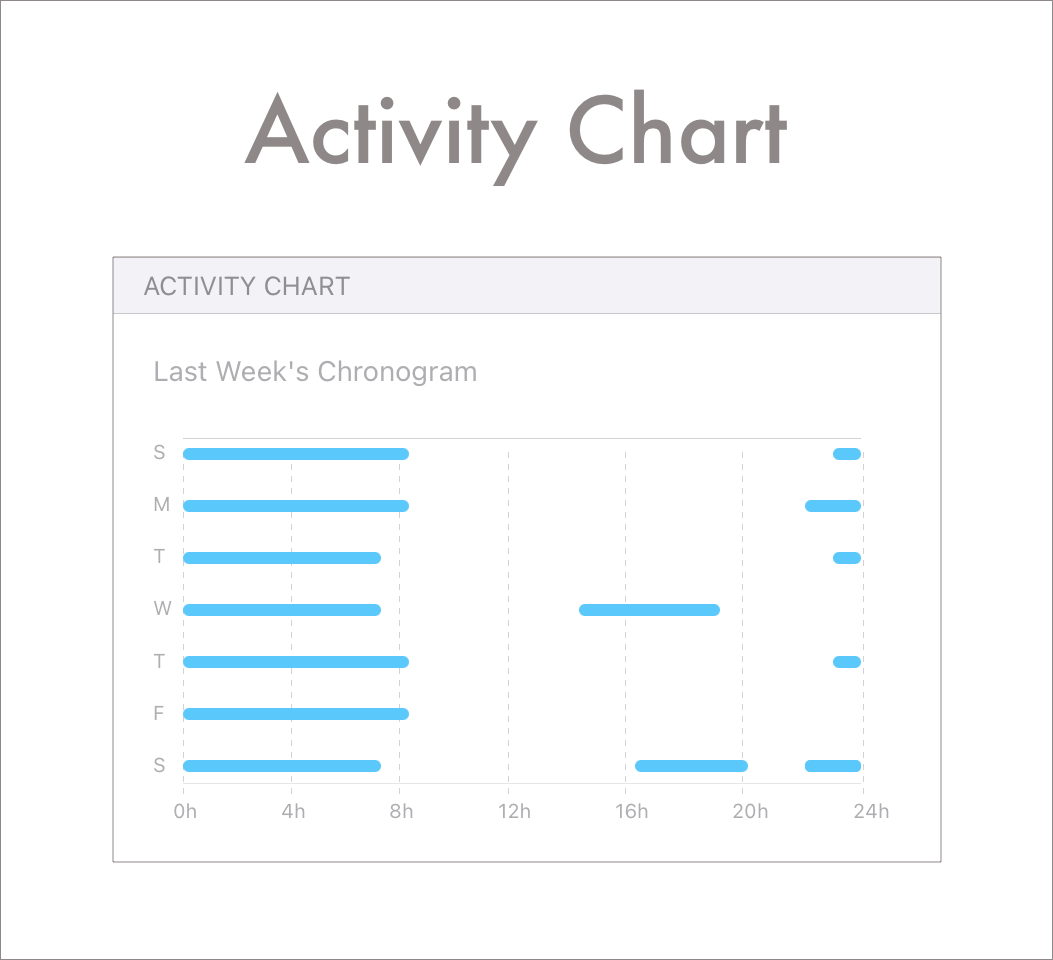
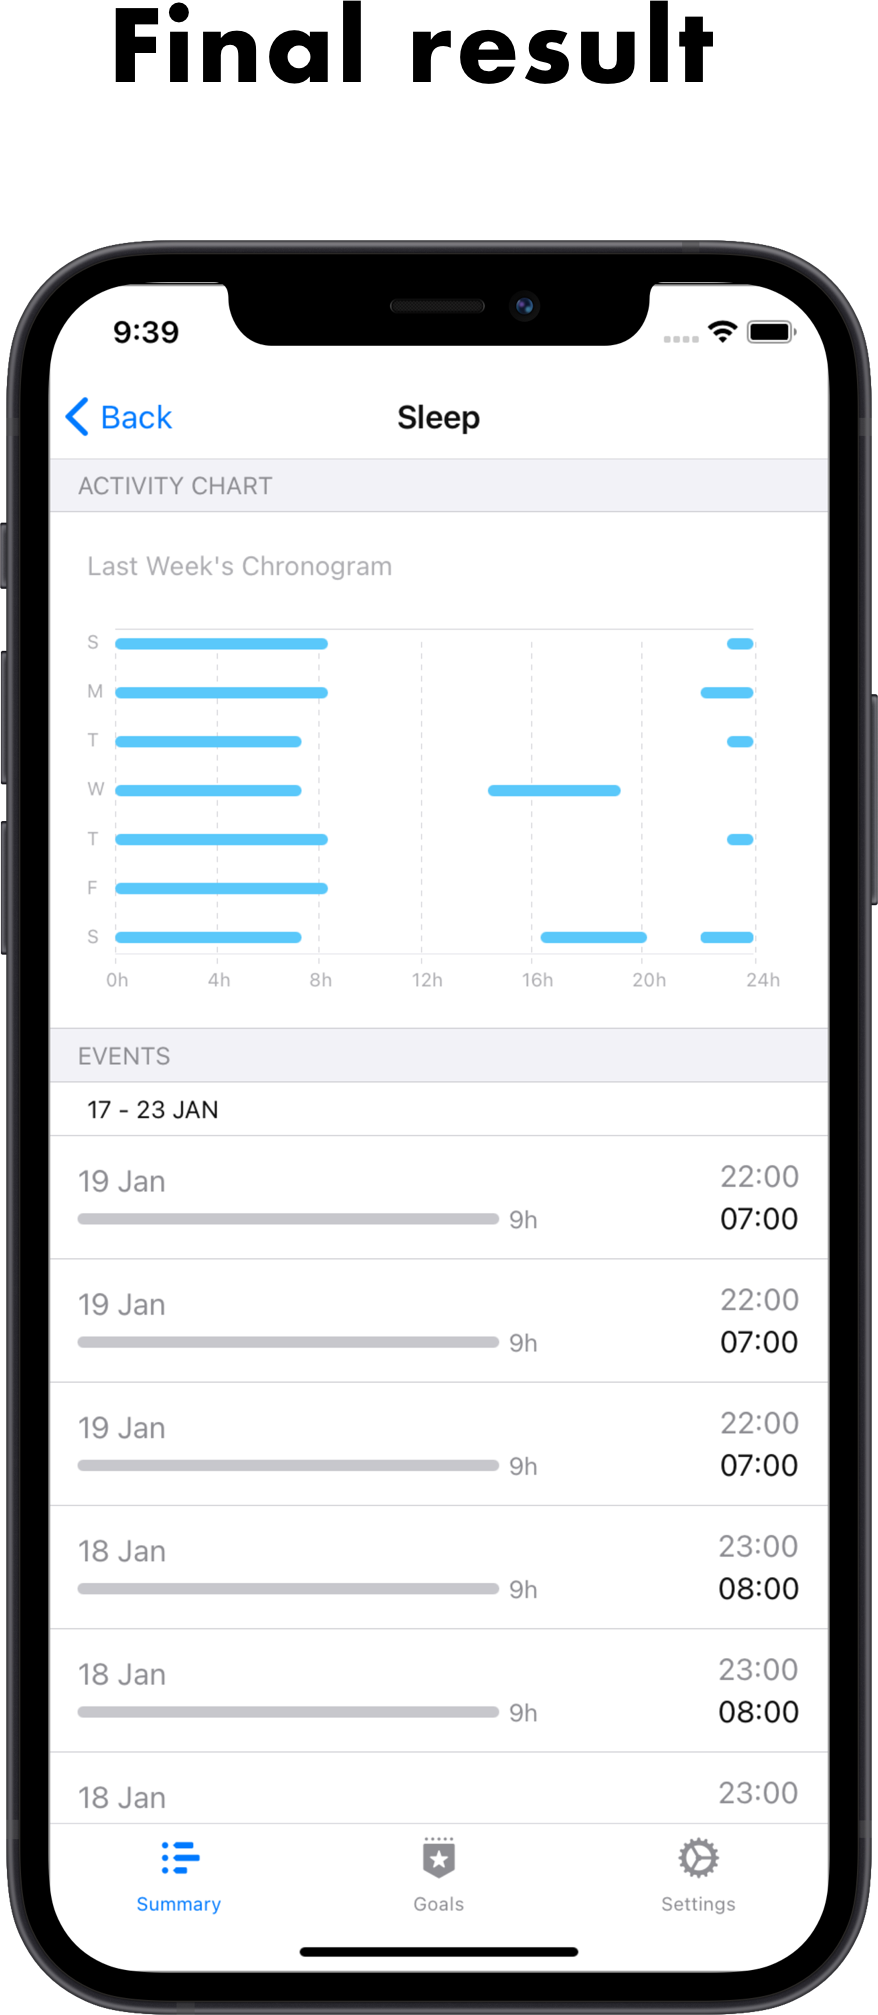
Final result
The user can change weeks by swiping to the right or left.
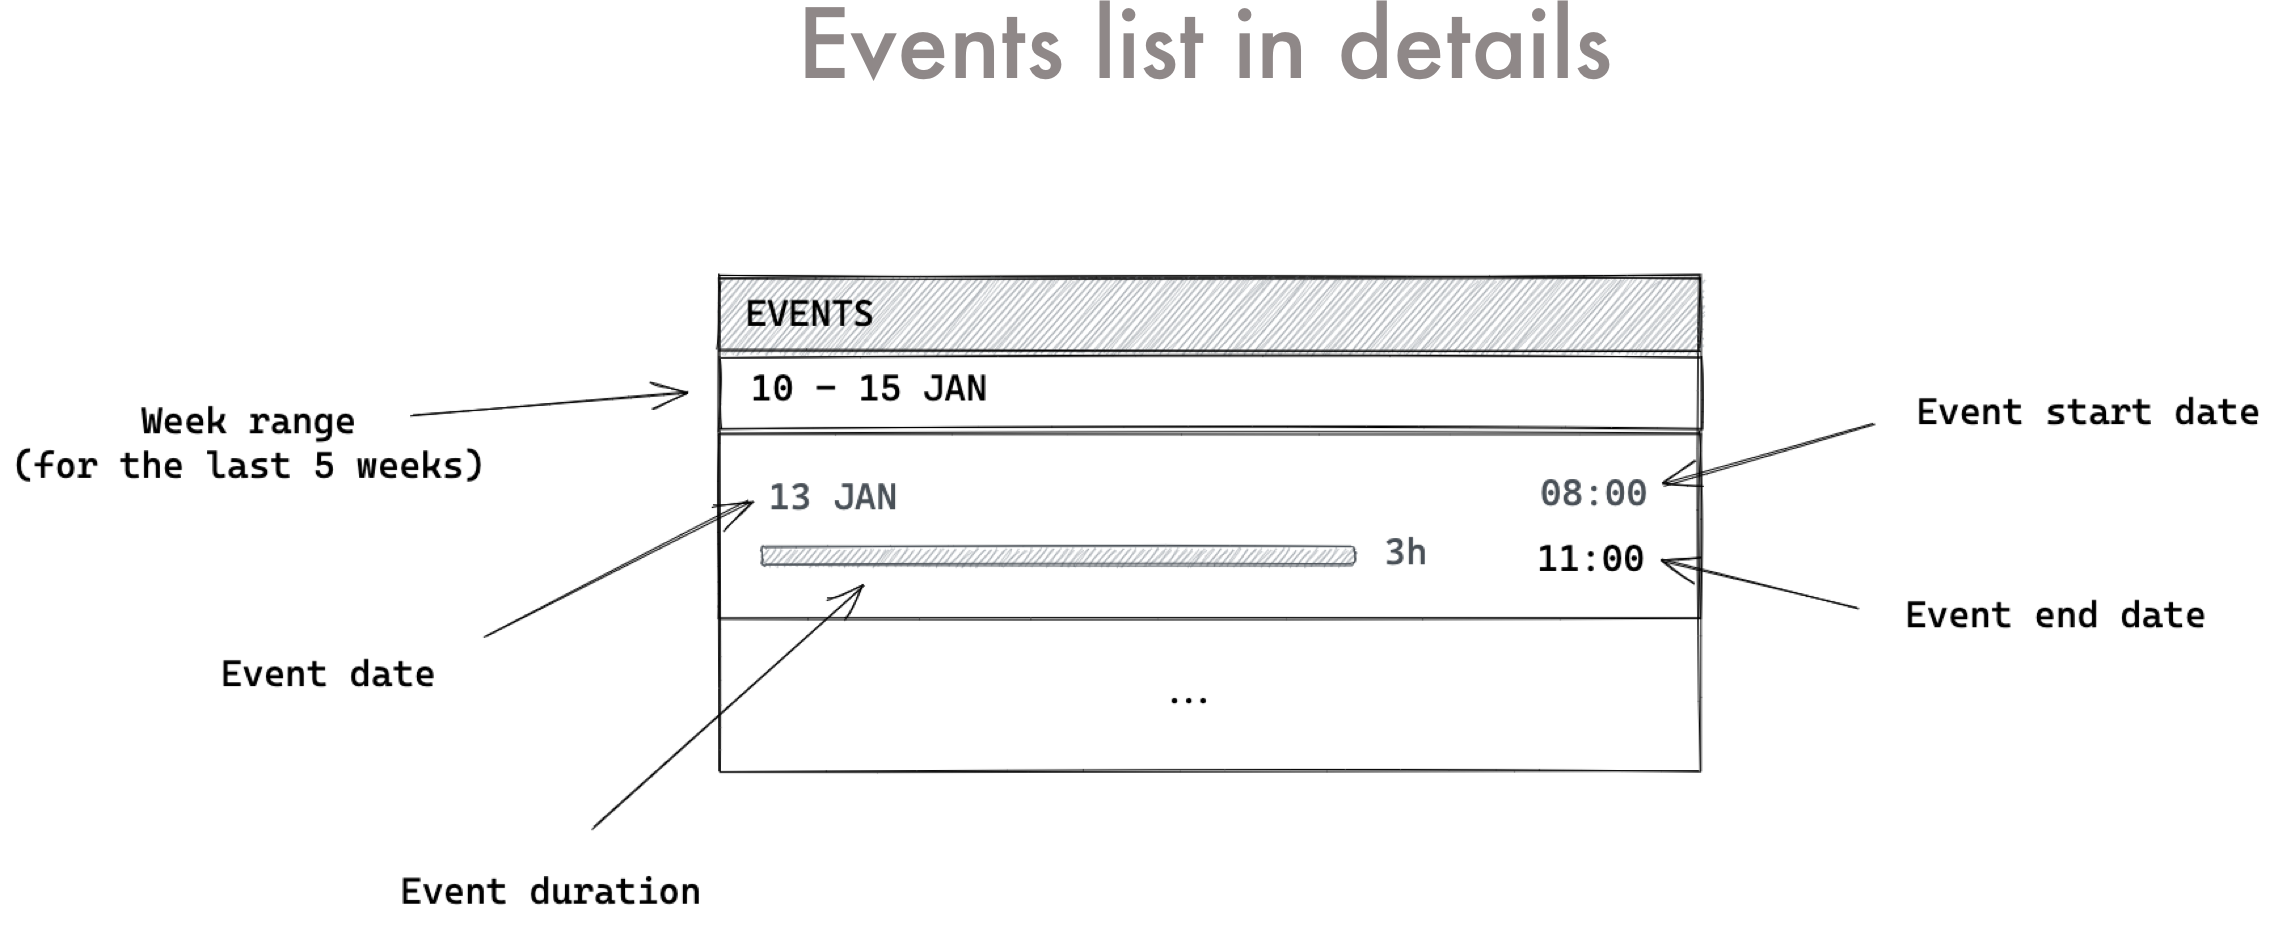
3. Add the events list
We will display the following information about the event:
- event date in the format: DD-MM
- event start date in the format: HH:SS
- event end date in the format: HH:SS
- event duration in the form of a duration bar
Compute the events duration
As seen above, the event duration will be displayed as a duration bar.
To do so we will need to compute some values:
availableWidthForBarwhich corresponds to the total width we can use to display the duration barmaxDurationwhich corresponds to the max duration through all the eventseventsWithDurationwhich is create an Array with(event, duration)
// Set the layout width
let (width, setWidth) = React.useState(() => 0.)
let onLayout = React.useCallback1((layoutEvent: Event.layoutEvent) => {
  let width = layoutEvent.nativeEvent.layout.width
  setWidth(_ => width)
}, [setWidth])

let availableWidthForBar = width -. 85. -. SpacedView.space *. 4.

// We compute the duration for all the events
// It will be used to display the duration bar
let eventsWithDuration = events->Array.map(event => {
  let durationInMin =
    Date.durationInMs(
      event.startDate->Js.Date.fromString,
      event.endDate->Js.Date.fromString,
    )->Date.msToMin
  (event, durationInMin)
})

// We compute the max duration through all the events
// It will be used to calculate the correct duration bar width
// in accordance with the event which has the longest duration
let maxDuration =
  eventsWithDuration->Array.reduce(0., (max, (_, duration)) => duration > max ? duration : max)
If we have no events for the selected week, we will show a message to the user otherwise we will display the events list.
// The onLayout will trigger the set_width and compute the width state value
<View onLayout>
  {switch eventsWithDuration->Array.length {
  | 0 =>
    <SpacedView horizontal=L>
      <Center>
        <Spacer />
        <Text
          style={Style.array([
            Theme.text["title3"],
            Theme.text["medium"],
            theme.styles["textLight2"],
          ])}>
          {"No events"->React.string}
        </Text>
        <Spacer size=XXS />
        <Text style={Style.array([Theme.text["footnote"], theme.styles["textLight2"]])}>
          {"You should add some events to your calendar or activate more calendars."->React.string}
        </Text>
        <Spacer />
      </Center>
    </SpacedView>
  | _x =>
    <View onLayout>
      <Row>
        <Spacer size=S />
        <BlockHeading
          style={Style.array([theme.styles["background"], theme.styles["text"]])}
          text={startDate->Js.Date.getDate->Belt.Float.toString ++
          " - " ++
          endDate->Js.Date.getDate->Belt.Float.toString ++
          " " ++
          endDate->Date.monthShortString}
        />
      </Row>
      <Separator style={theme.styles["separatorOnBackground"]} />
      {eventsWithDuration->Array.mapWithIndex((index, eventWithDuration) => {
        let (event, duration) = eventWithDuration
        let durationString = duration->Date.minToString
        // Display the current event
      })->React.array}
    </View>
  }
}
</View>
Display the duration bar
This component will be used to display the duration bar.
Here is the formula to compute the width of the bar, in dp:
For example, given:
- max duration through all the events: 90min
- current event duration: 50min
- available width: 200dp
The result will be equal to (50 / 90) * 200 = 111dp
<Row style={Predefined.styles["alignCenter"]}>
  <View
    style={
      open Style
      array([
        theme.styles["backgroundGray3"],
        viewStyle(
          ~width=(duration /. maxDuration *. availableWidthForBar)->dp,
          ~height=6.->dp,
          ~borderRadius=6.,
          ~overflow=#hidden,
          (),
        ),
      ])
    }
  />
  <Spacer size=XXS />
  <Text
    style={
      open Style
      array([Theme.text["footnote"], theme.styles["textLight1"]])
    }
    numberOfLines=1
    adjustsFontSizeToFit=true>
    // Display the duration
    // ex: 15h12m
    {durationString->React.string}
  </Text>
</Row>
Display the rest of the event information
We can now display the rest of the event information to the User.
<View key=event.id>
  <View style={Predefined.styles["rowSpaceBetween"]}>
    <Row>
      <Spacer size=S />
      <View>
        <Text
          style={Style.array([styles["text"], theme.styles["textLight1"]])}
          numberOfLines=1
          adjustsFontSizeToFit=true>
          {(event.endDate->Js.Date.fromString->Js.Date.getDate->Belt.Float.toString ++
          " " ++
          event.endDate->Js.Date.fromString->Date.monthShortString)->React.string}
        </Text>
        // The duration bar goes here
      </View>
    </Row>
    <View>
      // Display the start and end date of the event
      <SpacedView vertical=XS horizontal=None>
        <View style={Predefined.styles["row"]}>
          <View style={Predefined.styles["flexGrow"]}>
            <Text style={Style.array([styles["text"], theme.styles["textLight1"]])}>
              {Js.Date.fromString(event.startDate)
              ->Js.Date.toTimeString
              ->Js.String2.slice(~from=0, ~to_=5)
              ->React.string}
            </Text>
            <Text style={Style.array([styles["text"], theme.styles["text"]])}>
              {Js.Date.fromString(event.endDate)
              ->Js.Date.toTimeString
              ->Js.String2.slice(~from=0, ~to_=5)
              ->React.string}
            </Text>
          </View>
          <Spacer size=S />
        </View>
      </SpacedView>
    </View>
  </View>
  {index !== eventsWithDuration->Array.length - 1
    ? <Separator style={theme.styles["separatorOnBackground"]} />
    : React.null}
</View>
A little extra note
If you take a closer look you may notice the use of a component Spacer.
It is used to replace margins. You can learn more about Spacer here.
This is how it is implemented in react-multiversal:
let size =
  fun
  | XXL => space *. 4.
  | XL => space *. 3.
  | L => space *. 2.
  | M => space *. 1.
  | S => space *. 3. /. 4.
  | XS => space *. 2. /. 4.
  | XXS => space *. 1. /. 4.
  | Custom(value) => value;
We can use several sizes that are the result of a ratio with a constant space.
This allows us to have more consistent margins in our application.
Final result

Full result - Future ?
I will have to change some things to make the user experience more enjoyable.
As mentioned in the comments:
- load the current week then lazy load the other weeks
- in the same week, if a user has a lot of events, add a see more button to fetch the rest of the events
All these improvements will improve the performance and fluidity of navigation in the application.
Here is the final version of the Activity detail screen:
Takeaway
Problems encountered
The first problem that I've encountered was about the way I built the Activity detail events list.
I started by building it by fetching events from all the weeks at once.
The events were grouped according to their week in the list.
As you can imagine, this could be problematic if the user has a lot of events and it could lead to performance issues. I then thought about fetching the events by week as on the Home screen (triggered when the user switch week).
What did I learn ?
As I said before, ReasonML is a language that I particularly love.
This contribution was the opportunity to me to put into practice some concepts that I've learned in the past.
More specifically about building a mobile app in ReasonML.